搜索到
51
篇与
的结果
-
 一文吃透 Spring AI Alibaba + MCP:服务端搭建 + 客户端调用全流程 一、MCP概念介绍MCP(Model Context Protocol,模型上下文协议)是 Anthropic 于 2024 年推出的AI 领域统一连接协议,被称为 “AI 的 USB-C 接口”,核心是让大模型(LLM)通过标准化方式安全、灵活地调用外部工具、数据库、API 与文件系统,打破数据孤岛。从架构来看,MCP基于C/S(客户端-服务端)模式实现,因此要完成MCP调用,需分别搭建MCP服务端(暴露工具方法)和MCP客户端(调用服务端方法)。本文将基于Spring Ai Alibaba生态,完整实现“本地方法封装为MCP服务 + 客户端调用MCP服务”的全流程,步骤清晰、可直接落地。二、Spring AI MCP的介绍Spring AI MCP 为模型上下文协议提供 Java 和 Spring 框架集成。它使 Spring AI 应用程序能够通过标准化的接口与不同的数据源和工具进行交互,支持同步和异步通信模式。整体架构如下:三、搭建本地MCP服务端1. 添加依赖<dependency> <groupId>org.springframework.boot</groupId> <artifactId>spring-boot-starter</artifactId> </dependency> <dependency> <groupId>org.springframework.ai</groupId> <artifactId>spring-ai-starter-mcp-server-webflux</artifactId> <version>1.1.2</version> </dependency>注意:此处未使用常规的spring-boot-starter-web(内置Tomcat),因为spring-ai-starter-mcp-server-webflux与Tomcat存在冲突。使用spring-boot-starter会默认通过Netty启动服务,适配MCP服务端要求。2. 配置服务端application.ymlserver: port: 8088 # 服务端口,可自定义 servlet: encoding: enabled: true force: true charset: UTF-8 # 避免中文乱码 spring: application: name: local-mcp-server # 服务端应用名称 ai: mcp: server: type: async # 异步模式,提升调用性能 name: local-mcp-server # MCP服务名称 version: 1.0.0 # 服务版本3. 添加工具方法创建工具类,将需要对外暴露的方法用@Tool注解标记,并将该类交给Spring容器管理:@Service public class WeatherService { /** * 根据城市名称获取天气信息 * @param city 城市名称 * @return 天气描述 */ @Tool(description = "根据城市名称获取天气信息") public String getWeatherByCity(String city) { return city + " 今天天气很好!"; } }4. 添加MCP服务配置(McpServerConfig)创建配置类,通过ToolCallbackProvider将工具类(WeatherService)封装为MCP服务:@Configuration public class McpServerConfig { @Bean public ToolCallbackProvider weatherTools(WeatherService weatherService) { return MethodToolCallbackProvider.builder() .toolObjects(weatherService) .build(); } }5. 启动mcp-server 服务启动Spring Boot应用,查看控制台输出,确认服务启动成功(重点关注Netty启动信息):2026-03-19T14:33:17.730+08:00 INFO 35517 --- [local-mcp-server] [ main] o.s.b.web.embedded.netty.NettyWebServer : Netty started on port 8088 (http) 2026-03-19T14:33:17.734+08:00 INFO 35517 --- [local-mcp-server] [ main] com.jcq.server.McpServerApplication : Started McpServerApplication in 1.198 seconds 可以看到服务使用netty成功启动,端口是8088四、搭建MCP客户端1. 添加依赖client端正常配置spring-boot-starter-web,使用tomcat启动服务。<dependency> <groupId>org.springframework.boot</groupId> <artifactId>spring-boot-starter-web</artifactId> </dependency> <!-- Spring AI Alibaba Agent Framework --> <dependency> <groupId>com.alibaba.cloud.ai</groupId> <artifactId>spring-ai-alibaba-agent-framework</artifactId> <version>1.1.2.0</version> </dependency> <!-- DashScope ChatModel 支持(如果使用其他模型,请跳转 Spring AI 文档选择对应的 starter) --> <dependency> <groupId>com.alibaba.cloud.ai</groupId> <artifactId>spring-ai-alibaba-starter-dashscope</artifactId> <version>1.1.2.0</version> </dependency> <dependency> <groupId>org.springframework.ai</groupId> <artifactId>spring-ai-starter-mcp-client</artifactId> <version>1.1.2</version> </dependency>2. 配置客户端application.ymlspring: application: name: spring-ai-alibaba-agent # 客户端应用名称 ai: dashscope: api-key: ${AliQwen_API} # 通义千问API密钥,建议通过环境变量配置,避免硬编码 mcp: client: type: async # 与服务端一致,异步调用 request-timeout: 60s # 调用超时时间,可根据实际调整 toolcallback: enabled: true # 启用工具回调,用于接收服务端响应 sse: # mcp类型 connections: local-mcp-server: # 这里表示mcp服务名称 url: http://localhost:8088 # MCP服务端地址(对应服务端ip端口)3. 编写测试接口@RestController public class McpClientController { @Resource private ToolCallbackProvider toolCallbackProvider; /** * 测试MCP服务调用:查询指定城市天气 * 访问地址:http://localhost:8080/mcpTest(客户端端口默认8080,可自定义) */ @GetMapping("mcpTest") private void mcpTest() throws GraphRunnerException { // 1. 初始化DashScope聊天模型(可替换为其他LLM模型) ChatModel chatModel = getChatModel(); // 2. 获取MCP服务端暴露的工具方法 ToolCallback[] toolCallbacks = toolCallbackProvider.getToolCallbacks(); System.out.printf(""" =====Find the tools from spring ToolCallbackProvider===== %s """, JSON.toJSONString(toolCallbacks)); // 3. 构建智能体并绑定mcp服务 ReactAgent agent = ReactAgent.builder() .name("ip_search") .model(chatModel) .description("你是一个天气查询助手") .saver(new MemorySaver()) .toolCallbackProviders(toolCallbackProvider) .build(); // 4. 配置运行参数 RunnableConfig config = RunnableConfig.builder() .threadId("session") .build(); // 5. 流式调用agent Flux<NodeOutput> stream = agent.stream("上海天气怎么样", config); StringBuffer answerString = new StringBuffer(); stream.doOnNext(output -> { if (output.node().equals("_AGENT_MODEL_")) { answerString.append(((StreamingOutput<?>) output).message().getText()); } else if (output.node().equals("_AGENT_TOOL_")) { answerString.append("\nTool Call:").append(((ToolResponseMessage) ((StreamingOutput<?>) output).message()).getResponses().get(0)).append("\n"); } }) .doOnComplete(() -> System.out.println(answerString)) .doOnError(e -> System.err.println("Stream Processing Error: " + e.getMessage())) .blockLast(); } /** * 初始化DashScope聊天模型(通义千问) * @return ChatModel 聊天模型实例 */ private static ChatModel getChatModel() { DashScopeApi dashScopeApi = DashScopeApi.builder() .apiKey(System.getenv("AliQwen_API")) .build(); return DashScopeChatModel.builder() .dashScopeApi(dashScopeApi) .build(); } }4. 运行测试,查看结果确保MCP服务端(8088端口)已启动;启动MCP客户端,访问接口:http://localhost:8080/mcpTest查看客户端控制台输出,若出现以下内容,说明MCP服务调用成功:Tool Call:ToolResponse[id=call_b8f00f883a784fc1b35603, name=getWeatherByCity, responseData=[{"text":"\"上海 今天天气很好!\""}]]五、总结本文通过Spring Ai Alibaba,实现了MCP协议的本地服务落地,服务端获取天气逻辑后续可以替换为真实调用api接口。欢迎大家关注我,下一篇文章我将介绍一下如何调用MCP市场上的公开服务,敬请期待~
 -
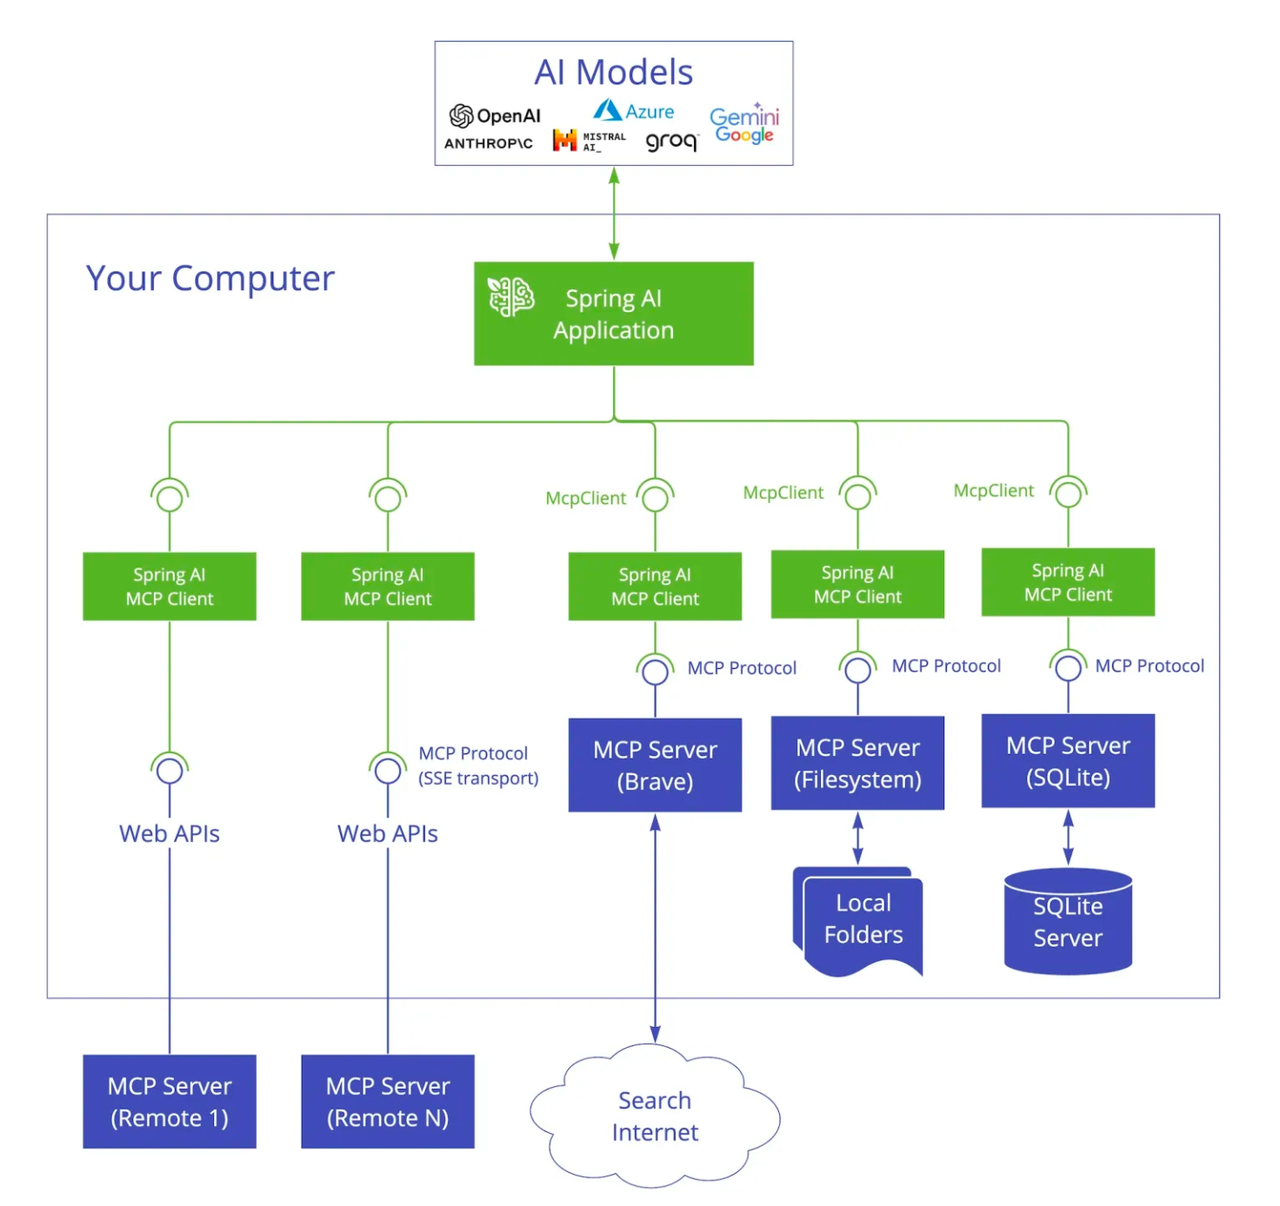
Agent Skills | Spring Ai Alibaba从零构建可扩展 AI 智能体 在当今AI应用开发领域,让AI智能体具备灵活的工具调用能力和可扩展的技能体系,是落地复杂业务场景的核心挑战。Spring AI Alibaba 原生提供了完善的 Skill 技能支持,能让智能体实现「技能发现→按需加载→工具执行」的全流程自动化。本文将从核心概念、组件解析、实战场景、最佳实践四个维度,手把手教你掌握 Spring AI Alibaba Skill 的使用方法。一、核心概念1.1 渐进式披露(核心设计思想)Spring AI Alibaba Skill 采用渐进式披露机制,最大化提升模型效率:系统初始仅注入技能元数据(名称、描述、路径);模型判断需要使用某技能时,调用 read_skill(skill_name) 加载完整的 SKILL.md 文档;最后按需访问技能资源、执行绑定工具。1.2 Skill 标准目录结构每个技能独立为一个子目录,SKILL.md 为强制必需文件,目录结构如下:skills/ # 技能根目录 └── pdf-extractor/ # 单个技能目录(自定义命名) ├── SKILL.md # ✅ 必需:技能核心定义文档 ├── references/ # 可选:技能参考资料 ├── examples/ # 可选:使用示例 └── scripts/ # 可选:执行脚本1.3 SKILL.md 格式规范SKILL.md 采用元数据+正文结构,元数据通过 --- 包裹,是模型识别技能的关键:--- name: pdf-extractor # 必需:小写字母、数字、连字符,最长64字符 description: 用于从PDF文档中提取文本、表格和表单数据 # 必需:简洁描述,超长会被截断 --- # PDF 提取技能 ## 功能说明 You are a PDF extraction specialist. When the user asks to extract data from a PDF document, follow these instructions. ## 使用方法 1. **Validate Input** - Confirm the PDF file path is provided. - The default path for the pdf file is the current working directory. - Use the `shell` or `read_file` tool to check if the file exists - Verify it's a valid PDF format 2. **Extract Content** - Execute the extraction script using the `shell` tool: ```bash python scripts/extract_pdf.py <pdf_file_path> ``` - The script will output JSON format with extracted data 3. **Process Results** - Parse the JSON output from the script - Structure the data in a readable format - Handle any encoding issues (UTF-8, special characters) 4. **Present Output** - Summarize what was extracted - Present data in the requested format (JSON, Markdown, plain text) - Highlight any issues or limitations ## Script Location The extraction script is located at: `scripts/extract_pdf.py` ## Output Format The script returns JSON: ```json { "success": true, "filename": "report.pdf", "text": "Full text content...", "page_count": 10, "tables": [ { "page": 1, "data": [["Header1", "Header2"], ["Value1", "Value2"]] } ], "metadata": { "title": "Document Title", "author": "Author Name", "created": "2024-01-01" } } ```scripts/extract_pdf.py简介,因为目前测试脚本的执行,所以mock返回了一个json格式的解析内容。二、核心组件解析Spring AI Alibaba Skill 体系由四大核心组件构成,各司其职、协同工作:2.1 对话模型(ChatModel)对接阿里通义千问大模型,是智能体的「大脑」,负责推理决策:private static ChatModel getChatModel() { // 构建通义千问API客户端 DashScopeApi dashScopeApi = DashScopeApi.builder() .apiKey(System.getenv("AliQwen_API")) // 环境变量配置API Key .build(); // 创建对话模型 return DashScopeChatModel.builder() .dashScopeApi(dashScopeApi) .build(); }2.2 技能注册中心(SkillRegistry)负责加载、管理所有技能,Spring AI Alibaba 提供两种常用实现:ClasspathSkillRegistry:从项目类路径(resources)加载技能FileSystemSkillRegistry:从本地文件系统加载技能代码示例:SkillRegistry registry = ClasspathSkillRegistry.builder() .classpathPath("skills") // 指向resources/skills目录 .build();2.3 技能钩子(SkillsAgentHook)连接智能体与技能系统的桥梁,负责注入技能上下文、提供工具调用能力:SkillsAgentHook hook = SkillsAgentHook.builder() .skillRegistry(registry) // 绑定技能注册中心 .build();2.4 ReAct 智能体(ReactAgent)基于 ReAct(推理+执行) 模式的智能体,自主完成「思考→选技能→执行任务」的全流程:ReactAgent agent = ReactAgent.builder() .name("skills-agent") // 智能体名称 .model(chatModel) // 绑定大模型 .saver(new MemorySaver()) // 内存记忆(保存对话上下文) .hooks(List.of(hook)) // 绑定技能钩子 .build();三、实战场景场景一:技能发现(智能体自我认知)让AI智能体主动披露自身具备的所有技能,验证技能加载是否成功。核心代码private static void findSkills() throws GraphRunnerException { // 1. 初始化核心组件 ChatModel chatModel = getChatModel(); SkillsAgentHook hook = getSkillsAgentHook(); // 2. 构建技能智能体 ReactAgent agent = ReactAgent.builder() .name("skills-agent") .model(chatModel) .saver(new MemorySaver()) .hooks(List.of(hook)) .build(); // 3. 执行对话:查询技能 AssistantMessage resp = agent.call("请介绍你有哪些技能"); System.out.println(resp.getText()); }执行结果11:29:36.067 [main] INFO com.alibaba.cloud.ai.graph.skills.registry.classpath.ClasspathSkillRegistry -- Loaded 1 skills from classpath: skills 我目前拥有的技能包括: - **pdf-extractor**: 用于从 PDF 文档中提取文本、表格和表单数据,适用于分析和处理 PDF 文件。当用户需要提取、解析或分析 PDF 文件时可使用此技能。 如需了解某项技能的详细说明(例如具体操作步骤、支持的文件类型、使用示例等),我可以为您读取其完整的技能文档(`SKILL.md`)。您也可以告诉我您的具体需求(例如:“请帮我从一份PDF中提取所有表格”),我会判断是否适用某项技能并执行相应操作。 是否需要我为您详细展开某一项技能?场景二:技能使用(PDF 信息提取)结合技能系统 + Python 执行工具 + Shell 工具,实现多工具协作,完成 PDF 文本/表格提取。步骤1:自定义 Python 执行工具(GraalVM 支持)依赖如下<!-- GraalVM Polyglot for Python execution --> <dependency> <groupId>org.graalvm.polyglot</groupId> <artifactId>polyglot</artifactId> <version>24.2.1</version> </dependency> <dependency> <groupId>org.graalvm.polyglot</groupId> <artifactId>python-community</artifactId> <version>24.2.1</version> <type>pom</type> </dependency>用于执行 Python 脚本完成 PDF 解析,工具代码如下:package com.jcq.springaialibabaagent.tools; import com.fasterxml.jackson.annotation.JsonProperty; import com.fasterxml.jackson.annotation.JsonPropertyDescription; import org.graalvm.polyglot.Context; import org.graalvm.polyglot.Engine; import org.graalvm.polyglot.PolyglotException; import org.graalvm.polyglot.Value; import org.slf4j.Logger; import org.slf4j.LoggerFactory; import org.springframework.ai.chat.model.ToolContext; import org.springframework.ai.tool.ToolCallback; import org.springframework.ai.tool.function.FunctionToolCallback; import java.util.function.BiFunction; /** * GraalVM 沙箱环境执行 Python 代码的工具 * 安全沙箱:禁用文件IO、进程创建、本地访问 */ public class PythonTool implements BiFunction<PythonTool.PythonRequest, ToolContext, String> { public static final String DESCRIPTION = """ Executes Python code and returns the result. - 代码必须为合法Python语法 - 沙箱执行,安全无风险 - 支持返回数字、字符串、数组、执行结果 """; private static final Logger log = LoggerFactory.getLogger(PythonTool.class); private final Engine engine; public PythonTool() { this.engine = Engine.newBuilder() .option("engine.WarnInterpreterOnly", "false") .build(); } /** 构建Spring AI 标准工具回调 */ public static ToolCallback createPythonToolCallback(String description) { return FunctionToolCallback.builder("python_tool", new PythonTool()) .description(description) .inputType(PythonRequest.class) .build(); } @Override public String apply(PythonRequest request, ToolContext toolContext) { if (request.code == null || request.code.trim().isEmpty()) { return "Error:Python代码不能为空"; } // 沙箱环境执行Python try (Context context = Context.newBuilder("python") .engine(engine) .allowAllAccess(false) .allowIO(false) .allowNativeAccess(false) .allowCreateProcess(false) .allowHostAccess(true) .build()) { log.debug("执行Python代码:{}", request.code); Value result = context.eval("python", request.code); // 结果类型转换 if (result.isNull()) return "执行完成,无返回值"; if (result.isString()) return result.asString(); if (result.isNumber() || result.isBoolean()) return result.toString(); if (result.hasArrayElements()) { StringBuilder sb = new StringBuilder("["); long size = result.getArraySize(); for (long i = 0; i < size; i++) { if (i > 0) sb.append(", "); sb.append(result.getArrayElement(i)); } return sb.append("]").toString(); } return result.toString(); } catch (PolyglotException e) { log.error("Python执行异常", e); return "执行错误:" + e.getMessage(); } } /** 工具请求参数 */ public static class PythonRequest { @JsonProperty(required = true) @JsonPropertyDescription("需要执行的Python代码") public String code; public PythonRequest() {} public PythonRequest(String code) { this.code = code; } } }步骤2:构建多技能协作智能体private static void useSkills() throws Exception { // 1. 初始化大模型 ChatModel chatModel = getChatModel(); // 2. 绑定技能钩子 + Shell工具钩子 SkillsAgentHook skillsHook = getSkillsAgentHook(); ShellToolAgentHook shellHook = ShellToolAgentHook.builder() .shellTool2(ShellTool2.builder(System.getProperty("user.dir")).build()) .build(); // 3. 构建智能体(绑定技能+工具+日志) ReactAgent agent = ReactAgent.builder() .name("skills-integration-agent") .model(chatModel) .saver(new MemorySaver()) .tools(PythonTool.createPythonToolCallback(PythonTool.DESCRIPTION)) // 自定义Python工具 .hooks(List.of(skillsHook, shellHook)) // 多钩子组合 .enableLogging(true) // 开启日志,便于调试 .build(); // 4. 执行PDF提取任务 String pdfPath = getTestSkillsDirectory() + "/pdf-extractor/skill-test.pdf"; AssistantMessage response = agent.call(String.format("请从 %s 文件中提取关键信息", pdfPath)); // 5. 输出结果 System.out.println("========== PDF提取结果 =========="); System.out.println(response.getText()); }执行结果========== The PDF extraction was successful! Here's the key information extracted from the `skill-test.pdf` file: ## Document Metadata - **Title**: Sample PDF Document - **Author**: Test Author - **Created**: 2024-01-01 - **Modified**: 2024-01-15 - **Page Count**: 5 pages ## Extracted Text The document contains: "This is extracted text from the PDF document. It contains multiple paragraphs and sections." ## Tables Found ### Table 1 (Page 1) - Product Inventory | Product | Price | Quantity | |---------|-------|----------| | Widget A | $10.00 | 100 | | Widget B | $15.00 | 50 | ### Table 2 (Page 3) - Financial Summary | Month | Revenue | Expenses | |-------|---------|----------| | January | $50,000 | $30,000 | | February | $55,000 | $32,000 |四、最佳实践建议技能规范化管理所有技能统一放在 resources/skills 目录,按业务拆分子目录;SKILL.md 严格遵循格式规范,保证模型准确识别。多钩子灵活组合基础能力:SkillsAgentHook(技能系统);系统操作:ShellToolAgentHook(Shell命令);自定义能力:自定义工具(Python/Java/第三方API)。开发与调试优化开发阶段开启 enableLogging(true),查看智能体推理全流程;测试使用 MemorySaver 快速验证,生产环境替换为持久化存储。模型选型策略简单技能查询:基础版通义千问;复杂工具协作/多步骤推理:高级版大模型。
-
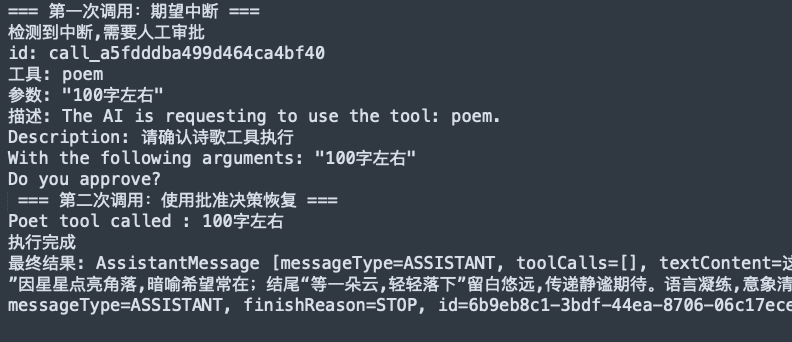
Spring AI Alibaba 人工介入实战|Human-in-the-Loop 让 AI 更可靠 引言在构建AI智能体应用时,我们经常面临一个关键挑战:如何让AI在执行某些敏感操作前获得人工确认?Spring AI Alibaba框架提供了强大的人工介入(Human-in-the-Loop)机制,让开发者能够精确控制AI工具的执行流程,在关键节点引入人工审批环节。本文将通过一个完整的实战示例,详细介绍如何在Spring AI Alibaba应用中实现人工介入功能。什么是人工介入?人工介入是一种机制,它允许AI智能体在执行特定工具前暂停执行,等待人工审批后再继续。这种机制特别适用于:敏感操作:如数据删除、资金转账等内容生成:如文章发布、诗歌创作等需要质量把控的场景权限控制:某些需要特定权限才能执行的操作审计要求:需要记录人工决策过程的场景实战示例:诗歌创作的人工审批让我们通过一个具体的例子来理解人工介入Hook的使用。这个示例展示了如何让AI在创作诗歌前获得人工确认。1. 项目依赖配置首先,确保你的项目中包含了Spring AI Alibaba相关依赖:<dependencies> <!-- Spring AI Alibaba Agent Framework --> <dependency> <groupId>com.alibaba.cloud.ai</groupId> <artifactId>spring-ai-alibaba-agent-framework</artifactId> <version>1.1.2.0</version> </dependency> <!-- DashScope ChatModel 支持(如果使用其他模型,请跳转 Spring AI 文档选择对应的 starter) --> <dependency> <groupId>com.alibaba.cloud.ai</groupId> <artifactId>spring-ai-alibaba-starter-dashscope</artifactId> <version>1.1.2.0</version> </dependency> </dependencies>2. 代码实现解析步骤1:构建AI模型// 构建DashScope API对象 DashScopeApi dashScopeApi = DashScopeApi.builder() .apiKey(System.getenv("AliQwen_API")) .build(); // 创建聊天模型 ChatModel chatModel = DashScopeChatModel.builder() .dashScopeApi(dashScopeApi) .build();步骤2:配置工具public class PoetTool implements BiFunction<String, ToolContext, String> { public int count = 0; public PoetTool() { } @Override public String apply( @ToolParam(description = "The original user query that triggered this tool call") String originalUserQuery, ToolContext toolContext) { count++; System.out.println("Poet tool called : " + originalUserQuery); return "在城市的缝隙里, \n" + "一束光悄悄发芽, \n" + "穿过钢筋水泥的沉默, \n" + "在风中轻轻说话。 \n" + "\n" + "夜色如墨,却不再黑, \n" + "星星点亮了每一个角落, \n" + "我站在时间的边缘, \n" + "等一朵云,轻轻落下"; } public static ToolCallback createPoetToolCallback() { return FunctionToolCallback.builder("poem", new PoetTool()) .description("用来写诗的工具") .inputType(String.class) .build(); } public static ToolCallback createPoetToolCallback(String name, PoetTool poetTool) { return FunctionToolCallback.builder(name, poetTool) .description("用来写诗的工具") .inputType(String.class) .build(); } }步骤3:构建带有Hook的智能体// 这里我们配置了poem工具需要人工审批,并提供了审批时的描述信息。 Map<String, ToolConfig> approvalOn = Map.of( "poem", ToolConfig.builder() .description("请确认诗歌工具执行") .build() ); ReactAgent agent = ReactAgent.builder() .name("single_agent") .model(chatModel) .saver(new MemorySaver()) // 使用内存保存状态 .tools(List.of(createPoetToolCallback())) // 添加诗歌创作工具 .hooks(HumanInTheLoopHook.builder() .approvalOn(approvalOn) // 添加人工介入Hook .build()) .outputKey("article") .build();步骤4:创建会话配置String threadId = "user-session-001"; RunnableConfig config = RunnableConfig.builder() .threadId(threadId) .build();步骤5:执行并处理中断// 第一次调用 - 触发中断 Optional<NodeOutput> result = agent.invokeAndGetOutput( "帮我写一首100字左右的诗", config ); // 检查是否触发中断 if (result.isPresent() && result.get() instanceof InterruptionMetadata) { InterruptionMetadata interruptionMetadata = (InterruptionMetadata) result.get(); System.out.println("检测到中断,需要人工审批"); // 获取工具反馈信息 List<InterruptionMetadata.ToolFeedback> toolFeedbacks = interruptionMetadata.toolFeedbacks(); for (InterruptionMetadata.ToolFeedback feedback : toolFeedbacks) { System.out.println("id: " + feedback.getId()); System.out.println("工具: " + feedback.getName()); System.out.println("参数: " + feedback.getArguments()); System.out.println("描述: " + feedback.getDescription()); } // 模拟人工决策(批准) InterruptionMetadata.Builder feedbackBuilder = InterruptionMetadata.builder() .nodeId(interruptionMetadata.node()) .state(interruptionMetadata.state()); toolFeedbacks.forEach(toolFeedback -> { InterruptionMetadata.ToolFeedback approvedFeedback = InterruptionMetadata.ToolFeedback.builder(toolFeedback) .result(InterruptionMetadata.ToolFeedback.FeedbackResult.APPROVED) .build(); feedbackBuilder.addToolFeedback(approvedFeedback); }); InterruptionMetadata approvalMetadata = feedbackBuilder.build(); // 使用人工反馈恢复执行 RunnableConfig resumeConfig = RunnableConfig.builder() .threadId(threadId) .addMetadata(RunnableConfig.HUMAN_FEEDBACK_METADATA_KEY, approvalMetadata) .build(); Optional<NodeOutput> finalResult = agent.invokeAndGetOutput("", resumeConfig); if (finalResult.isPresent()) { System.out.println("执行完成"); // 因为创建智能体的时候,指定了outputKey,所以这里我们直接获取 Object article = finalResult.get().state().data().get("article"); System.out.println("最终结果: " + article); } }3. 执行流程分析这个示例的执行流程如下:触发阶段:用户请求AI创作诗歌中断阶段:AI检测到poem工具需要人工审批,暂停执行审批阶段:系统展示工具信息,等待人工决策恢复阶段:人工批准后,AI继续执行并生成诗歌完成阶段:返回最终结果高级特性多工具审批你可以为多个工具配置审批:Map<String, ToolConfig> approvalOn = Map.of( "poem", ToolConfig.builder().description("诗歌创作工具").build(), "delete", ToolConfig.builder().description("数据删除工具").build(), "publish", ToolConfig.builder().description("内容发布工具").build() );审批结果类型支持多种审批结果:APPROVED:批准执行REJECTED:拒绝执行MODIFIED:修改参数后执行最佳实践1. 明确审批策略只为真正需要人工确认的工具配置审批提供清晰的审批描述信息考虑审批的时效性2. 用户体验优化提供友好的审批界面支持批量审批操作记录审批历史便于审计3. 错误处理try { Optional<NodeOutput> result = agent.invokeAndGetOutput(request, config); // 处理中断和结果 } catch (GraphRunnerException e) { // 处理执行异常 log.error("智能体执行失败", e); }4. 状态管理// 使用合适的Saver .saver(new MemorySaver()) // 内存存储,适合开发测试 .saver(new RedisSaver()) // Redis存储,适合生产环境 .saver(new DatabaseSaver()) // 数据库存储,适合需要持久化的场景5. 执行结果拓展Spring Ai Alibaba还为我们内置了几个其他的HookSummarizationHook(消息压缩)当对话很长时,自动压缩对话历史,防止超出模型上下文限制ModelCallLimitHook(模型调用限制)防止Agent无限调用模型,控制成本另外,我们也可以自定义Hook,这部分内容如果大家感兴趣的话,后面可以单独介绍一下下~参考资料HumanInTheLoopHook API文档
-
使用Spring AI Alibaba构建智能体Agent 前言随着大语言模型(LLM)技术的快速发展,构建智能Agent应用变得越来越简单。本文将通过两个实际的代码示例,展示如何使用Spring AI Alibaba框架构建功能丰富的天气查询Agent,从基础的测试实现到生产级的完整应用。技术栈概述Spring AI Alibaba: 阿里巴巴开源的AI应用开发框架DashScope: 阿里云的AI模型服务平台React Agent: 基于ReAct(Reasoning and Acting)范式的智能代理示例一:SimpleTest - 快速入门添加核心依赖<dependencies> <!-- Spring AI Alibaba Agent Framework --> <dependency> <groupId>com.alibaba.cloud.ai</groupId> <artifactId>spring-ai-alibaba-agent-framework</artifactId> <version>1.1.2.0</version> </dependency> <!-- DashScope ChatModel 支持(如果使用其他模型,请跳转 Spring AI 文档选择对应的 starter) --> <dependency> <groupId>com.alibaba.cloud.ai</groupId> <artifactId>spring-ai-alibaba-starter-dashscope</artifactId> <version>1.1.2.0</version> </dependency> </dependencies>代码结构分析@Test void agentTest() throws GraphRunnerException { // 1. 初始化 DashScope API DashScopeApi dashScopeApi = DashScopeApi.builder() .apiKey(System.getenv("AliQwen_API")) .build(); // 2. 创建 ChatModel ChatModel chatModel = DashScopeChatModel.builder() .dashScopeApi(dashScopeApi) .build(); // 3. 定义天气工具 ToolCallback weatherTool = FunctionToolCallback.builder("get_weather", new WeatherTool()) .description("获取某个城市的天气") .inputType(String.class) .build(); // 4. 构建React Agent ReactAgent agent = ReactAgent.builder() .name("weather_agent") .model(chatModel) .tools(weatherTool) .systemPrompt("你是一个非常有帮助的助手") .saver(new MemorySaver()) .build(); // 5. 调用Agent AssistantMessage response = agent.call("上海今天天气怎么样?"); System.out.println(response.getText()); }核心特性简洁的配置: 通过Builder模式快速构建Agent工具集成: 使用FunctionToolCallback将自定义函数包装为Agent可调用的工具内存存储: 使用MemorySaver保存对话历史中文支持: 完整的中文提示词和工具描述自定义工具实现class WeatherTool implements BiFunction<String, ToolContext, String> { @Override public String apply(String city, ToolContext toolContext) { return city + "今天天气非常好!"; } }这个简单的工具类展示了如何将业务逻辑封装为Agent可调用的函数。示例二:RealAgent - 真实的智能体高级特性概览相比SimpleTest,RealAgent展示了更多生产级特性:精细的模型配置多工具协同结构化输出对话上下文管理核心代码解析1. 系统提示词设计String SYSTEM_PROMPT = """ 你是一位擅长说**天气冷笑话/谐音梗**的专业天气预报员。 你可以使用两个工具: - **get_weather_for_location**:用于获取指定地点的天气 - **get_user_location**:用于获取用户当前所在位置 如果用户询问天气,**必须先确认地点**。 如果从问题中能判断出他们指的是**自己所在的地方**, 就使用 **get_user_location** 工具获取他们的位置。 """;这个提示词体现了几个重要设计原则:角色定位: 明确Agent的身份和特色工具说明: 清晰描述可用工具的功能行为约束: 规定了工具使用的逻辑顺序2. 模型参数优化ChatModel chatModel = DashScopeChatModel.builder() .dashScopeApi(dashScopeApi) .defaultOptions(DashScopeChatOptions.builder() .model(DashScopeChatModel.DEFAULT_MODEL_NAME) .temperature(0.5) // 平衡创造性和准确性 .maxToken(1000) // 控制响应长度 .build()) .build();3. 多工具协同// 天气查询工具 ToolCallback getWeatherTool = FunctionToolCallback .builder("getWeatherForLocation", new WeatherForLocationTool()) .description("获取一个给定城市的天气") .inputType(String.class) .build(); // 用户定位工具 ToolCallback getUserLocationTool = FunctionToolCallback .builder("getUserLocation", new UserLocationTool()) .description("根据User Id获取用户位置") .inputType(String.class) .build();4. 结构化输出配置ReactAgent agent = ReactAgent.builder() // ... 其他配置 .outputType(ResponseFormat.class) // 指定输出格式 .hooks(humanInTheLoopHook) .build();5. 对话上下文管理RunnableConfig runnableConfig = RunnableConfig.builder() .threadId(Thread.currentThread().getId() + "") .build(); // 第一次调用 AssistantMessage response1 = agent.call("上海今天天气怎么样", runnableConfig); // 第二次调用(保持上下文) AssistantMessage response2 = agent.call("明天天气怎么样", runnableConfig);通过RunnableConfig的threadId实现多轮对话的上下文保持。总结通过这两个示例,我们可以看到Spring AI Alibaba框架在构建智能Agent应用方面的强大能力:SimpleTest展示了快速原型开发的能力,适合概念验证和学习RealAgent则创建了一个基础的 ReactAgent,接下来可以:探索更多的工具集成学习如何使用不同的 Checkpoint 实现对话持久化了解如何使用 Hooks 扩展 agent 功能学习如何创建多 agent 系统参考资料Spring AI Alibaba官方文档DashScope平台
-
大模型“无脑复读”?3分钟搞懂原因+解决办法 最近在调用大模型时,遇到了一个十分棘手的怪象——模型输出陷入“死循环”,不停重复相同内容,像一台复读机,如下图所示。为了解决这个问题,我查阅了相关资料,梳理出大模型重复输出的现象分级、核心原因以及可解决办法,整理成文分享给大家,帮大家快速摆脱“复读机”困扰。一、现象分级:大模型“复读”分3种大模型的重复输出并非单一情况,根据重复的范围和程度,可分为以下3个级别,大家可以对照判断自己遇到的情况:词汇/短语级重复:最基础的重复形式,模型生成的文本中,同一个词语、短语或短句反复出现,比如一句话在同一段落中被多次复制粘贴,阅读起来十分冗余。段落级重复:当生成较长文本(如文章、方案)时,模型可能生成重复的句子群或完整段落,甚至出现与前文几乎完全一致的内容段,严重影响内容的完整性和可读性。内容结构级重复:针对结构化回答需求(如分点解析、步骤说明),模型可能多次使用相似的结构、句式进行解释,虽然核心内容略有差异,但整体框架重复,显得拖沓且缺乏新意。二、核心原因:3大因素导致模型“卡壳复读”1. 提示词问题(最常见,占比最高)需求提示不清晰:如果给模型的提示过于模糊、笼统,没有明确回答方向、范围或要求,模型无法精准捕捉需求,就会通过重复内容“凑数”,形成冗余输出。上下文缺失:模型的回答依赖上下文信息,如果提问时没有提供足够的背景、前提,或对话过程中上下文断裂,模型无法理解需求的核心,就容易陷入重复循环。2. 模型参数设置不合理温度(temperature)设置过低:温度值控制模型输出的随机性,当温度设置过低(如0),模型会生成保守、确定的内容,倾向于重复高概率词汇和句式,进而出现重复。Top-k/Top-p采样策略不当:这两个参数用于控制模型选择词汇的范围,若设置不合理,会导致模型只能选择少数高概率词汇,无法生成多样化内容,最终陷入重复。3. 模型本身的局限性最终的输出内容由大模型的核心算法、参数配置和训练数据决定。如果模型本身存在训练不充分、参数优化不足等问题,也可能导致其在生成内容时,容易出现重复输出的情况。三、解决办法:对症施策,快速解决“复读”问题针对上述原因,整理了可直接落地的解决办法,从易到难,大家可以按需尝试,基本能解决80%以上的重复输出问题:1. 优化提示词明确禁止重复:在提示词中直接添加“禁止输出重复信息”“避免重复句式和内容”等要求,直接约束模型的输出行为。丰富上下文:补充足够的背景信息、前提条件,或在对话中逐步递进提问,让模型清晰理解需求,避免因信息不足导致重复。细化需求+拆分问题:将模糊的需求拆解成更小的子问题,明确每个问题的回答方向(如“从3个不同角度解析XX”“分步骤说明XX”),引导模型生成多样化内容。2. 调整模型参数调整temperature:将温度值设置在0.7-0.9之间,这个区间既能保证输出内容的准确性,又能增加随机性,鼓励模型生成更多不同的内容,避免重复。优化Top-p采样:适当调整Top-p的值(通常设置在0.9左右),扩大模型选择词汇的范围,让模型有更多创作空间,减少重复概率。