搜索到
51
篇与
的结果
-
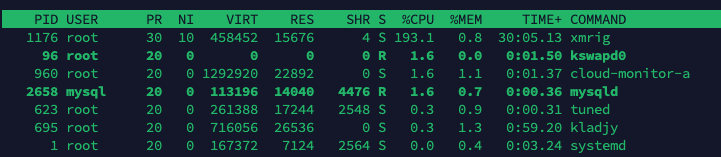
 服务器遭遇 XMRig 挖矿程序入侵排查与清理全记录 一、异常察觉我的服务器配置本就不高,仅用于博客搭建,日常访问量也不大。但某天明显感觉服务器异常卡顿,通过 top 命令查看,发现 CPU 长期高负载,xmrig 进程疯狂占用资源,初步判断遭遇挖矿程序入侵。二、XMRig是什么 XMRig 是专为门罗币(XMR)设计的 高性能 CPU 挖矿软件 ,基于 cpuminer-m 开发,还优化了容器环境运行能力,会疯狂榨取系统资源挖取加密货币,属于典型的 “资源小偷”。三、挖矿进程追踪1、进程定位用 ps -ef | grep xmrig 命令一查,果然!xmrig 进程正以 root 高权限运行,肆无忌惮占用系统资源搞挖矿运算。2、自启动溯源1. 系统服务检查执行 systemctl list-unit-files --state=enabled 排查开机自启服务,未直接找到 xmrig 相关服务,但后续发现恶意创建的 c3pool_miner.service 服务,配置文件中明确 ExecStart=/usr/workspace/xmrig --config=/usr/workspace/config.json ,用于实现挖矿程序自启动。2. 定时任务挖掘检查 /etc/crontab 、 /etc/cron.d/ 等定时任务目录。发现/etc/cronta最后一项每分钟都执行的任务,比较可疑,删除掉3. 启动脚本排查查看 ~/.bashrc 、 /etc/rc.local 等文件,确认是否存在恶意启动 xmrig 命令,防止挖矿程序通过用户登录脚本或系统启动脚本自启。四、清理与修复过程1、紧急终止进程使用 sudo kill -9 <PID> ( <PID> 为 xmrig 进程 ID )强制终止挖矿进程,暂时缓解 CPU 高负载问题。2、删除恶意服务与程序文件1. 服务清理:对 c3pool_miner.service ,依次执行:sudo systemctl stop c3pool_miner.service # 停服务 sudo systemctl disable c3pool_miner.service # 禁用自启 sudo rm /etc/systemd/system/c3pool_miner.service # 删配置文件 sudo systemctl daemon-reload # 重载系统服务配置 2. 删光程序文件根据服务配置路径,找到 /usr/workspace/ 下的 xmrig 程序和 config.json ,执行:sudo rm -rf /usr/workspace/xmrig sudo rm -rf /usr/workspace/config.json 3、预防复发措施密码重置:改 root、sudo 用户及数据库密码,提升账号安全性,让攻击者 “进不来”。端口收紧:只开放必要端口(如 Web 服务的 80、443 ),用防火墙限制无关连接,减少入侵入口。系统更新:定期 sudo apt update、sudo apt upgrade ,及时打补丁、修漏洞,让系统 “无懈可击”。五、总结与反思这服务器遭遇 xmrig 挖矿程序入侵,暴露出系统安全防护存在不足。后续需加强服务器安全管理,定期进行安全检查与漏洞扫描,及时更新系统和软件,严格管控端口与服务,提升服务器整体安全性,避免再次遭受类似恶意程序攻击。
 -
Ubuntu环境Mysql安装的保姆级教程 一、Ubuntu简介Ubuntu 是一款基于 Debian 的开源 Linux 操作系统,由南非企业家马克・沙特尔沃思(Mark Shuttleworth)创立的 Canonical 公司主导开发,首次发布于 2004 年。其名称源自非洲祖鲁语或科萨语,意为 “人性” 或 “共享的关怀”,体现了开源社区协作共享的理念。二、Mysql简介MySQL 是一款开源的关系型数据库管理系统(RDBMS),由瑞典 MySQL AB 公司开发,后被 Sun 公司收购,最终随 Sun 并入 Oracle 公司。它以高性能、稳定性、易用性和开源免费为核心优势,成为全球最流行的数据库之一,广泛应用于 Web 开发、企业级应用、数据存储等场景。三、安装 本文介绍Mysql的在线安装过程1、更新软件包sudo apt update2、下载Mysql# 安装最新版本 sudo apt install -y mysql-server # 安装指定版本 sudo apt install -y mysql-server-8.03、启动Mysql、并设置为开机运行sudo systemctl start mysql sudo systemctl enable mysql4、检查mysql状态sudo systemctl status mysql如果出现active(running),则表示安装启动成功了四、允许远程可视化工具连接1、修改 MySQL 配置文件:找到配置文件,Linux 系统一般位于/etc/mysql/mysql.conf.d/mysqld.cnf,可以使用命令mysql --help | grep "my.cnf"查找。打开配置文件,找到bind-address = 127.0.0.1这一行,将其改为bind-address = 0.0.0.0,表示监听所有 IP 地址上的连接请求。如果是生产环境,也可指定特定 IP,如bind-address = 192.168.1.100。2、创建或授权远程访问用户: 1) 登录 MySQL 服务打开终端,执行以下命令登录 MySQL ,输入 root 密码完成认证(若首次安装无密码,直接回车即可)mysql -u root -p2) 创建并授权新用户(推荐方式)2.1 创建远程访问用户通过 SQL 命令创建新用户,支持自定义用户名、密码,以及控制可访问的 IP 范围:-- 允许任意 IP 访问(% 代表所有 IP) CREATE USER 'remote_user'@'%' IDENTIFIED BY 'your_password'; -- 仅允许指定 IP(如 192.168.1.100)访问,按需替换 -- CREATE USER 'remote_user'@'192.168.1.100' IDENTIFIED BY 'your_password'; 说明: - remote_user:自定义的用户名,可根据需求修改 - your_password:设置的用户密码,建议复杂度足够(字母 + 数字 + 特殊字符) - % 或 192.168.1.100:控制允许登录的 IP 范围,% 适合信任网络,指定 IP 更安全2.2 授予用户远程访问权限创建用户后,需赋予权限并刷新使配置生效:-- 授予所有权限(生产环境可按需缩小权限范围,如指定数据库) GRANT ALL PRIVILEGES ON *.* TO 'remote_user'@'%' WITH GRANT OPTION; -- 刷新权限,让配置立即生效 FLUSH PRIVILEGES; 说明: - ALL PRIVILEGES:授予全部权限(谨慎使用,生产环境建议细化,如 GRANT SELECT,INSERT ON db_name.* TO ... ) - .:表示所有数据库的所有表,可替换为 db_name.* 限制特定数据库3) 修改已有用户权限(备用方案)若不想新建用户,可直接修改现有用户的远程访问权限:-- 允许任意 IP 访问已有用户(替换 existing_user 和 password) GRANT ALL PRIVILEGES ON *.* TO 'existing_user'@'%' IDENTIFIED BY 'password'; -- 刷新权限 FLUSH PRIVILEGES; 说明: - existing_user:替换为实际的已有用户名 - password:替换为该用户对应的密码 - 此操作会同时重置用户密码(若无需改密码,需保持原密码一致)注意如果安装的是msyql8.0及以上版本GRANT 语句的语法有变化,不再支持在 GRANT 语句里直接用 IDENTIFIED BY 创建 / 修改用户密码,得拆分成两步操作。解决方法(分两步执行)1. 先创建 / 修改用户并设置密码(用 CREATE USER 或 ALTER USER):-- 若用户 root@% 不存在,创建并设密码 CREATE USER 'root'@'%' IDENTIFIED BY 'yourpassword'; -- 若用户已存在,修改密码用这个: -- ALTER USER 'root'@'%' IDENTIFIED BY 'yourpassword'; 2. 再给用户授权:GRANT ALL PRIVILEGES ON *.* TO 'root'@'%'; -- 刷新权限让修改生效 FLUSH PRIVILEGES; ## 3、重启 MySQL 服务:使配置生效执行命令sudo systemctl restart mysql4、配置防火墙或安全组,开放3306端口五、远程连接验证结果如图
-
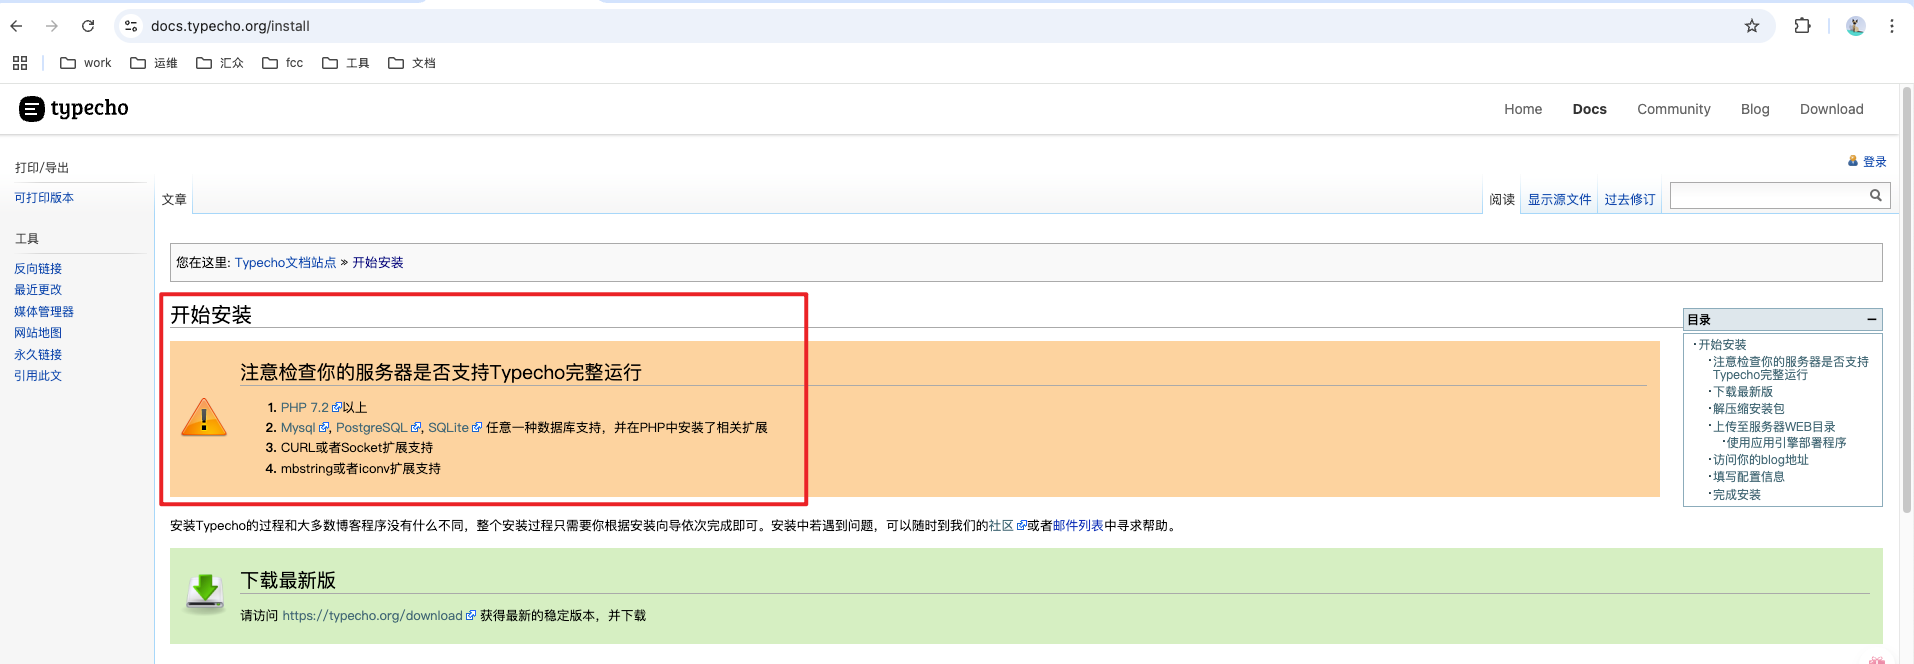
从零起步,Ubuntu环境搭建Typecho个人博客的保姆级教程 一、确认服务器环境是否满足要求根据Typecho官网要求,运行需要基础环境支持,先检查是否安装以下组件:Web 服务器:Nginx 或 Apache(推荐 Nginx,更轻量)。PHP:5.6 及以上版本(推荐 7.2+),并需启用必要扩展(如 pdo_mysql、mbstring、json、gd 等)。数据库:MySQL 或 MariaDB(用于存储博客数据)。 官网链接: https://typecho.org/二、快速安装基础环境默认大家没有任何环境,从零开始# 安装 Nginx、PHP、MySQL sudo apt update sudo apt install nginx php php-fpm php-mysql php-mbstring php-gd php-json mysql-server三、下载并上传至服务器根据官网下载链接,将下载的zip压缩包,放在服务器自定义的目录下,以/usr/local/typecho 为例四、配置 Web 服务器(以 Nginx 为例)Web 服务器需要将访问请求指向 Typecho 的安装目录(/usr/local/typecho),并处理 PHP 解析。1、创建 Nginx 配置文件sudo nano /etc/nginx/sites-available/typecho # 新建配置文件2、写入配置内容根据你的服务器 IP 或域名修改以下内容(假设用 IP 访问,或已解析域名):server { listen 80; # 监听 80 端口(HTTP) server_name your_domain.com; # 替换为你的域名或服务器 IP(如 1.2.3.4) # 网站根目录指向 Typecho 解压目录 root /usr/local/typecho; index index.php index.html; # 默认索引文件 # 关键:Typecho 伪静态规则(必须添加) location / { # 如果请求的文件或目录不存在,将请求转发给 index.php 处理 if (!-e $request_filename) { rewrite ^(.*)$ /index.php?$1 last; } } # PHP 解析配置(保持不变) location ~ \.php$ { fastcgi_pass unix:/run/php/php8.1-fpm.sock; # 替换为你的 PHP 版本 fastcgi_index index.php; include fastcgi_params; fastcgi_param SCRIPT_FILENAME $document_root$fastcgi_script_name; } # 禁止访问隐藏文件(保持不变) location ~ /\. { deny all; access_log off; log_not_found off; } # 静态资源缓存(保持不变) location ~* \.(jpg|jpeg|png|gif|ico|css|js)$ { expires 30d; add_header Cache-Control "public, max-age=2592000"; } # 日志配置(可选) access_log /var/log/nginx/typecho_access.log; error_log /var/log/nginx/typecho_error.log; }注意:fastcgi_pass 中的 PHP 版本需与你安装的一致(可通过 ls /run/php/ 查看实际 sock 文件名)。3、启用配置并重启 Nginxsudo ln -s /etc/nginx/sites-available/typecho /etc/nginx/sites-enabled/ # 启用站点 sudo nginx -t # 检查配置是否有误 sudo systemctl restart nginx # 重启 Nginx五、设置 Typecho 目录权限Typecho 需要对部分目录有写入权限(如配置文件、缓存、上传目录),否则安装时会提示 “无法写入配置文件”。执行以下命令修改权限:# 递归设置目录所有者为 Web 服务器用户(Nginx 通常用 www-data) sudo chown -R www-data:www-data /usr/local/typecho # 确保关键目录可写(可选,根据实际提示调整) sudo chmod -R 755 /usr/local/typecho/usr # 上传和缓存目录 sudo chmod 755 /usr/local/typecho # 根目录(确保能生成 config.inc.php)六、准备数据库Typecho 需要数据库存储文章、用户等数据,需提前创建数据库和用户。1、登录mysqlsudo mysql -u root -p # 输入 root 密码(首次安装可能无密码,直接回车)2、执行sql命令创建数据库和用户-- 创建数据库(名称自定义,如 typecho_db) CREATE DATABASE typecho_db CHARACTER SET utf8mb4 COLLATE utf8mb4_unicode_ci; -- 创建数据库用户(用户名和密码自定义,如 typecho_user / your_password) CREATE USER 'typecho_user'@'localhost' IDENTIFIED BY 'your_password'; -- 授权用户访问数据库 GRANT ALL PRIVILEGES ON typecho_db.* TO 'typecho_user'@'localhost'; -- 刷新权限 FLUSH PRIVILEGES; -- 退出 MySQL exit;七、通过浏览器访问并完成安装打开本地电脑的浏览器,输入服务器的 IP 地址 或 域名(如 http://1.2.3.4 或 http://your_domain.com)。如果配置正确,会看到 Typecho 的安装向导页面。
-
在 Ubuntu 环境下安装与配置 Nginx 的完整指南 Nginx简介 Nginx是一款高性能的开源 Web 服务器、反向代理服务器、负载均衡器和 HTTP 缓存工具。它由俄罗斯程序员伊戈尔・赛索耶夫(Igor Sysoev)于 2004 年首次公开发布,最初设计的目标是解决高并发场景下的性能瓶颈,如今已成为全球最流行的服务器软件之一,被 Netflix、Airbnb、GitHub、腾讯、阿里等众多大型企业广泛使用。本文将详细介绍如何在 Ubuntu 系统中安装、配置并优化 Nginx,适合初学者入门参考。一、安装 NginxUbuntu 的官方软件仓库中已经包含了 Nginx,我们可以通过 APT 包管理器轻松安装。更新系统包列表首先确保系统包列表是最新的:sudo apt update安装 Nginx执行以下命令安装 Nginx:sudo apt install nginx验证安装是否成功安装完成后,Nginx 会自动启动。可以通过以下命令检查其运行状态:sudo systemctl status nginx如果看到 "active (running)" 字样,说明 Nginx 已经成功启动。配置防火墙 4.1 如果你的 Ubuntu 系统启用了 UFW 防火墙,需要允许 HTTP(80 端口)和 HTTPS(443 端口)流量:sudo ufw allow 'Nginx Full'可以通过以下命令验证防火墙规则:sudo ufw status 4.2 如果你跟我一样,使用的是云服务器,那么只需要在安全组中开放80端口即可二、Nginx的基本操作掌握以下基本命令可以帮助你管理 Nginx 服务:启动 Nginx:sudo systemctl start nginx停止 Nginx:sudo systemctl stop nginx重启 Nginx:sudo systemctl restart nginx重新加载配置(不中断服务):sudo systemctl reload nginx设置开机自启动:sudo systemctl enable nginx禁止开机自启动:sudo systemctl disable nginx三、Nginx 的配置文件结构Nginx 的配置文件位于/etc/nginx目录下,主要文件和目录包括:/etc/nginx/nginx.conf:主配置文件/etc/nginx/sites-available/:存储所有网站的配置文件/etc/nginx/sites-enabled/:存储启用的网站配置(通常是指向 sites-available 目录的软链接)/etc/nginx/conf.d/:可以存放额外的配置片段/etc/nginx/mime.types:定义 MIME 类型这种结构允许我们为每个网站创建独立的配置文件,便于管理。四、配置一个基本的 Web 站点下面我们创建一个简单的 Web 站点配置:创建网站目录首先为网站创建一个目录,并设置适当的权限:sudo mkdir -p /var/www/example.com/html sudo chown -R $USER:$USER /var/www/example.com/html sudo chmod -R 755 /var/www创建测试页面在网站目录下创建一个简单的 HTML 文件:nano /var/www/example.com/html/index.html添加以下内容:预览 <!DOCTYPE html> <html> <head> <title>Welcome to Example.com!</title> </head> <body> <h1>Success! The example.com server block is working!</h1> </body> </html>保存并关闭文件。创建服务器配置文件在sites-available目录下创建一个新的配置文件:sudo nano /etc/nginx/sites-available/example.com添加以下配置:server { listen 80; listen [::]:80; root /var/www/example.com/html; index index.html index.htm index.nginx-debian.html; server_name example.com www.example.com; # 替换为你的域名或服务器 IP(如 1.2.3.4) location / { try_files $uri $uri/ =404; } }这个配置指定了:监听 80 端口(HTTP)网站文件根目录默认索引文件服务器域名基本的请求处理规则启用站点配置通过创建软链接将配置文件链接到sites-enabled目录:sudo ln -s /etc/nginx/sites-available/example.com /etc/nginx/sites-enabled/检查配置文件语法在应用配置之前,先检查语法是否正确:sudo nginx -t如果输出 "nginx: configuration file /etc/nginx/nginx.conf test is successful",说明配置没有问题。重新加载 Nginx使配置生效:sudo systemctl reload nginx测试网站如果你的域名已经解析到服务器 IP,现在可以通过浏览器访问http://example.com来查看效果。如果没有域名,可以修改本地hosts文件进行测试。五、注意如果访问80端口,显示Apache2默认页面,说明80端口被Apache服务器占用了,可以通过一下命令停止Apache服务器sudo systemctl stop apache2再次访问就可以成功访问到我们部署的页面了
-
自己动手写 Java 虚拟机笔记 - 第十部分:异常处理机制实现(系列终章) 前言在前一章中,我们实现了本地方法调用与反射机制,让 JVM 具备了与底层交互和动态访问类信息的能力。本章将聚焦 JVM 的 异常处理机制—— 这是保障程序健壮性的核心功能。Java 异常分为 Checked 异常和 Unchecked 异常,通过 throw 关键字抛出,依赖异常处理表和 athrow 指令实现捕获与处理。本章将完整实现异常的抛出、捕获逻辑,以及堆栈跟踪功能,并通过测试验证异常处理的正确性。作为系列笔记的终章,本章结尾还将对整个 JVM 实现之旅进行总结。参考资料《自己动手写 Java 虚拟机》—— 张秀宏开发环境工具 / 环境版本说明操作系统MacOS 15.5基于 Intel/Apple Silicon 均可JDK1.8用于字节码分析和测试Go 语言1.23.10项目开发主语言第十章:异常处理机制实现异常处理是 Java 语言的重要特性,允许程序在运行时捕获并处理错误,而非直接崩溃。JVM 通过异常处理表记录捕获逻辑,通过 athrow 指令抛出异常,并在栈中查找合适的处理程序。本章将实现这一完整流程。一、异常概述:类型与继承关系Java 中的所有异常都继承自 java.lang.Throwable,按是否必须捕获分为两类:异常类型定义示例Checked 异常非 RuntimeException 和 Error 的子类,必须显式捕获或声明抛出IOException、ClassNotFoundExceptionUnchecked 异常包括 RuntimeException 及其子类(运行时异常)和 Error 及其子类(错误),无需显式捕获NullPointerException、OutOfMemoryError继承关系核心:java.lang.Object └── java.lang.Throwable ├── java.lang.Error(错误,如 StackOverflowError) └── java.lang.Exception(异常) ├── Checked 异常(如 IOException) └── java.lang.RuntimeException(运行时异常,Unchecked)二、异常抛出:throw 关键字与 athrow 指令在 Java 代码中,通过 throw 关键字抛出异常,对应字节码中的 athrow 指令,负责将异常对象从操作数栈弹出并触发异常处理流程。1. athrow 指令的核心逻辑athrow 指令的执行流程:从操作数栈弹出异常对象引用(必须是非 null 的 Throwable 实例);遍历当前线程的栈帧,在每个方法的异常处理表中查找匹配的异常处理程序;找到处理程序后,清空当前栈帧的操作数栈,将异常对象推入栈顶,跳转到处理程序执行;若遍历所有栈帧仍未找到处理程序,则终止线程并输出堆栈跟踪。// ATHROW 异常抛出指令 type ATHROW struct { base.NoOperandsInstruction } func (a *ATHROW) Execute(frame *rtda.Frame) { // 1. 从操作数栈弹出异常对象 ex := frame.OperandStack().PopRef() if ex == nil { panic("java.lang.NullPointerException") // 不能抛出 null } thread := frame.Thread() // 2. 查找异常处理程序 if !findAndGotoExceptionHandler(thread, ex) { // 3. 未找到处理程序,输出堆栈并终止线程 handleUncaughtException(thread, ex) } }三、异常处理表:捕获逻辑的存储结构每个方法的 Code 属性中包含异常处理表(exception_table),记录该方法中异常捕获的范围、类型和处理程序位置,是异常捕获的核心依据。1. 异常处理表的结构// ExceptionHandler 异常处理表中的一项 type ExceptionHandler struct { startPc int // 异常监控的起始 PC 地址(包含) endPc int // 异常监控的结束 PC 地址(不包含) handlerPc int // 异常处理程序的 PC 地址(跳转目标) catchType *ClassRef // 捕获的异常类型(null 表示捕获所有异常,对应 catch (Throwable)) } // ExceptionTable 异常处理表(由多个 ExceptionHandler 组成) type ExceptionTable []*ExceptionHandler字段说明:startPc 和 endPc:定义监控的代码范围([startPc, endPc)),该范围内抛出的异常会被当前处理程序监控;handlerPc:当异常被捕获时,程序计数器跳转至此地址执行处理逻辑;catchType:指定捕获的异常类型(通过常量池中的类符号引用),null 表示捕获所有异常(对应 catch (Throwable))。2. 异常处理程序的查找逻辑当异常抛出后,JVM 需要在当前方法的异常处理表中查找最合适的处理程序:// findExceptionHandler 查找匹配的异常处理程序 func (t ExceptionTable) findExceptionHandler(exClass *Class, pc int) *ExceptionHandler { for _, handler := range t { // 1. 检查当前 PC 是否在监控范围内([startPc, endPc)) if pc >= handler.startPc && pc < handler.endPc { // 2. 若捕获所有异常(catchType 为 null),直接返回 if handler.catchType == nil { return handler } // 3. 解析捕获的异常类型,检查是否与抛出的异常兼容 catchClass := handler.catchType.ResolveClass() if catchClass == exClass || exClass.IsSubClassOf(catchClass) { // 异常类型匹配(抛出的异常是捕获类型或其子类) return handler } } } return nil // 未找到匹配的处理程序 }匹配规则:优先匹配范围包含当前 PC 且异常类型兼容的处理程序;若存在多个匹配的处理程序,按在异常处理表中的顺序优先选择第一个。四、异常处理流程:从抛出到捕获异常处理的完整流程涉及栈帧遍历、处理程序查找和流程跳转,确保异常被正确捕获或向上传播。1. 查找并执行异常处理程序// findAndGotoExceptionHandler 在栈中查找异常处理程序并跳转 func findAndGotoExceptionHandler(thread *rtda.Thread, ex *heap.Object) bool { for { // 1. 获取当前栈顶栈帧 frame := thread.CurrentFrame() // 当前指令的 PC(抛出异常的位置) pc := frame.NextPC() - 1 // 2. 在当前方法的异常处理表中查找处理程序 handler := frame.Method().ExceptionTable().findExceptionHandler(ex.Class(), pc) if handler != nil { // 3. 找到处理程序:清空操作数栈,推送异常对象,跳转执行 stack := frame.OperandStack() stack.Clear() stack.PushRef(ex) frame.SetNextPC(handler.handlerPc) return true } // 4. 未找到,弹出当前栈帧,继续在调用栈中查找 thread.PopFrame() // 5. 若栈为空,说明未找到任何处理程序 if thread.IsStackEmpty() { break } } return false }流程说明:从抛出异常的方法开始,逐层遍历调用栈(弹出栈帧),在每个方法的异常处理表中查找匹配的处理程序;找到后,清空当前栈帧的操作数栈,将异常对象推入栈顶,设置程序计数器为 handlerPc 执行处理逻辑;若遍历所有栈帧仍未找到处理程序,则该异常为 “未捕获异常”,触发线程终止。五、堆栈跟踪:fillInStackTrace 本地方法当异常未被捕获时,JVM 需要输出堆栈跟踪信息(包含异常类型、消息和调用栈),帮助定位问题。这一功能通过 Throwable.fillInStackTrace() 本地方法实现。1. 堆栈跟踪元素的结构堆栈跟踪由多个 StackTraceElement 组成,每个元素记录调用栈中的一个方法信息:// StackTraceElement 堆栈跟踪元素 type StackTraceElement struct { fileName string // 文件名(如 "ParseIntTest.java") className string // 类名(如 "ParseIntTest") methodName string // 方法名(如 "bar") lineNumber int // 行号(-1 表示未知) }2. fillInStackTrace 实现该方法填充异常的堆栈信息,记录从异常抛出点到线程启动的完整调用栈:// 注册本地方法:java/lang/Throwable.fillInStackTrace() func init() { native.Register("java/lang/Throwable", "fillInStackTrace", "(I)Ljava/lang/Throwable;", fillInStackTrace) } // fillInStackTrace 填充异常的堆栈跟踪信息 func fillInStackTrace(frame *rtda.Frame) { this := frame.LocalVars().GetThis() // 获取 Throwable 实例 // 从当前线程的栈帧中收集堆栈信息 stacks := collectStackTraceElements(frame.Thread(), this) // 将堆栈信息存储到异常对象中(通过 extra 字段) this.SetExtra(stacks) frame.OperandStack().PushRef(this) // 返回异常对象本身 } // collectStackTraceElements 收集堆栈跟踪元素 func collectStackTraceElements(thread *rtda.Thread, ex *heap.Object) []*StackTraceElement { var elements []*StackTraceElement // 遍历线程的栈帧(跳过 fillInStackTrace 方法本身的栈帧) for frame := thread.CurrentFrame().Lower(); frame != nil; frame = frame.Lower() { method := frame.Method() class := method.Class() // 创建堆栈元素:包含类名、方法名、文件名和行号 element := &StackTraceElement{ className: class.JavaName(), methodName: method.Name(), fileName: class.SourceFile(), // 从类的 SourceFile 属性获取文件名 lineNumber: method.GetLineNumber(frame.NextPC() - 1), // 获取当前 PC 对应的行号 } elements = append(elements, element) } return elements }功能:通过遍历线程的栈帧,收集每个方法的类名、方法名、文件名和行号,最终存储到异常对象中,为后续打印堆栈跟踪提供数据。六、测试:异常处理全流程验证通过 ParseIntTest 测试类验证异常的抛出、捕获和堆栈跟踪功能:1. 测试代码public class ParseIntTest { public static void main(String[] args) { foo(args); // 调用 foo 方法 } private static void foo(String[] args) { try { bar(args); // 调用 bar 方法,可能抛出异常 } catch (NumberFormatException e) { // 捕获数字格式化异常 System.out.println("捕获 NumberFormatException:" + e.getMessage()); } } private static void bar(String[] args) { if (args.length == 0) { // 若没有参数,抛出索引越界异常 throw new IndexOutOfBoundsException("没有输入参数!"); } // 尝试将参数转换为整数(可能抛出 NumberFormatException) int x = Integer.parseInt(args[0]); System.out.println("解析结果:" + x); } }2. 测试场景与结果场景 1:无参数运行(java ParseIntTest)→ bar 方法抛出 IndexOutOfBoundsException,未被 foo 的 NumberFormatException 捕获,向上传播至 main 方法,最终输出堆栈跟踪。场景 2:参数为非数字(java ParseIntTest abc)→ Integer.parseInt 抛出 NumberFormatException,被 foo 的 catch 块捕获并处理。测试结果:两种场景均按预期执行,异常捕获逻辑和堆栈输出正确。系列总结:自己动手写 JVM 的旅程从第一部分的命令行工具到本章的异常处理,我们完成了一个简易 JVM 的核心功能实现。回顾整个系列,我们走过了以下关键旅程:1. 基础搭建(第一、二章)实现命令行参数解析,作为 JVM 的入口;设计类路径查找逻辑,支持从 JAR 包、目录加载 Class 文件。2. 类加载与解析(第三、六章)解析 Class 文件结构,提取魔数、版本号、常量池、字段、方法等信息;实现方法区存储类元信息,通过类加载器完成 “加载→链接→初始化” 流程;解析符号引用为直接引用,建立类、字段、方法的运行时关联。3. 运行时数据区(第四、五章)实现线程、虚拟机栈、栈帧、局部变量表、操作数栈等核心结构;设计指令集和解释器,支持常量加载、算术运算、控制转移等基础指令;实现方法调用与返回机制,支持静态绑定和动态绑定(多态)。4. 复杂数据结构(第七、八章)实现数组的动态创建和操作指令,支持基本类型和引用类型数组;通过字符串池实现字符串常量的共享,支持字符串拼接和 intern 机制。5. 扩展能力(第九、十章)设计本地方法注册与调用框架,实现反射核心功能和类库依赖的本地方法;完整实现异常处理机制,支持异常抛出、捕获和堆栈跟踪。收获与展望通过亲手实现 JVM,我们深入理解了 “Write once, run anywhere” 的底层逻辑:从 Class 文件的二进制结构到指令执行的每一个细节,从内存管理到异常处理,每一部分都是对计算机体系结构和面向对象思想的深度实践。这个简易 JVM 仍有许多可扩展之处(如 JIT 编译、垃圾回收、并发支持等),但已覆盖核心功能,足以执行简单的 Java 程序。希望这份笔记能为同样对 JVM 原理感兴趣的开发者提供参考,让我们在探索技术底层的道路上继续前行。源码地址:https://github.com/Jucunqi/jvmgo.git