搜索到
20
篇与
的结果
-
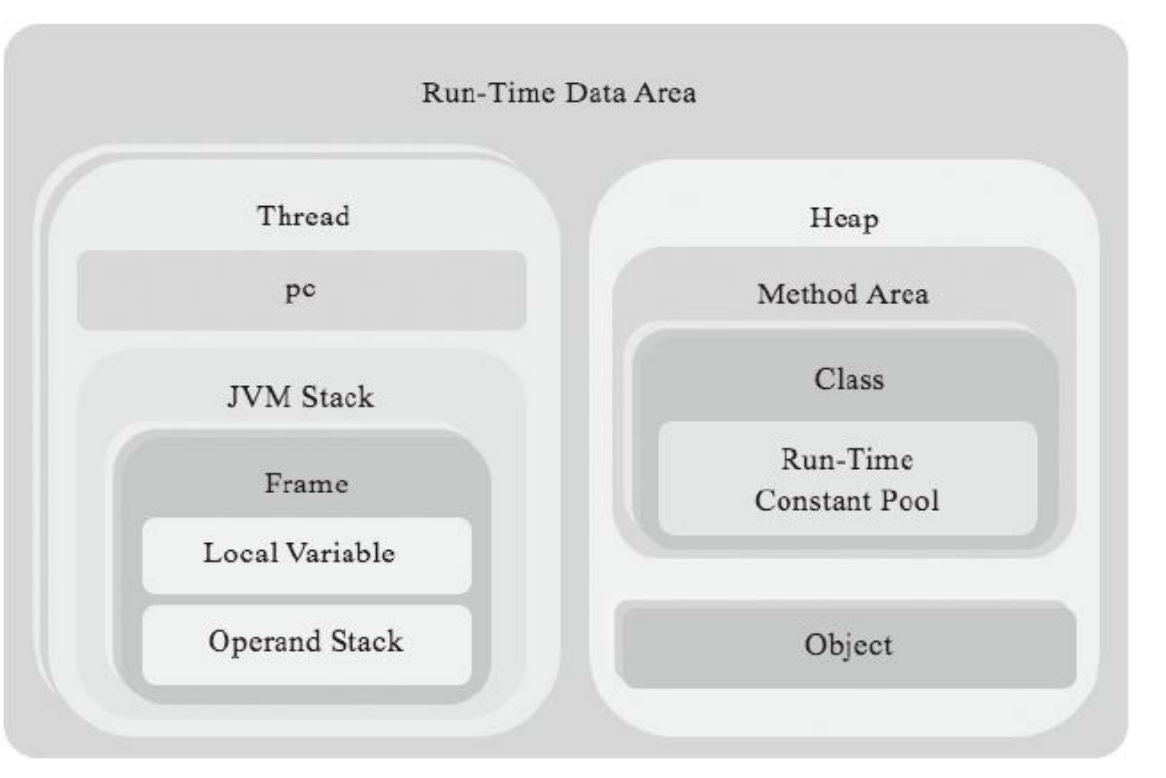
 自己动手写 Java 虚拟机笔记 - 第四部分:实现运行时数据区 前言在前一章中,我们完成了 Class 文件的解析,获取了类的结构信息(字段、方法、常量等)。本章将聚焦 JVM 的运行时数据区—— 这是 JVM 执行字节码时存储数据和中间结果的核心区域,也是实现方法调用、变量存储的基础。参考资料《自己动手写 Java 虚拟机》—— 张秀宏开发环境工具 / 环境版本说明操作系统MacOS 15.5基于 Intel/Apple Silicon 均可JDK1.8用于字节码分析和测试Go 语言1.23.10项目开发主语言第四章:运行时数据区核心实现运行时数据区是 JVM 执行程序时的 “内存空间”,主要包含线程私有区域(程序计数器、虚拟机栈、本地方法栈)和线程共享区域(方法区、堆)。本章重点实现线程私有区域的核心结构,为后续字节码执行打下基础。一、运行时数据区整体架构JVM 运行时数据区的结构如图所示,其中线程私有区域与线程一一对应,随线程创建而创建、销毁而销毁;共享区域则被所有线程共享。本章核心实现:线程(Thread)、虚拟机栈(Stack)、栈帧(Frame)、局部变量表(LocalVars)、操作数栈(OperandStack)。二、数据类型在运行时的存储方式JVM 中的数据类型分为两类,其存储方式直接影响运行时数据区的设计:1. 基本数据类型特点:存储数据本身,不需要引用。类型:int(4 字节)、long(8 字节)、float(4 字节)、double(8 字节)、byte/short/char(均按 int 存储)、boolean(按 int 存储,0 为 false,非 0 为 true)。存储:基本类型直接存放在局部变量表或操作数栈的 “槽位(Slot)” 中,其中 long 和 double 占 2 个槽位,其他类型占 1 个槽位。2. 引用数据类型特点:存储对象的引用(指针),而非对象本身。类型:类实例、数组、接口等。存储:引用存放在局部变量表或操作数栈的 1 个槽位中,指向堆中的实际对象。三、核心结构实现1. 线程(Thread):运行时数据区的 “载体”线程是 JVM 执行的基本单位,每个线程对应一个虚拟机栈。线程还包含程序计数器(PC),用于记录当前执行的字节码指令地址。package rtda // Thread 封装线程相关的运行时数据 type Thread struct { pc int // 程序计数器:记录当前执行的字节码指令地址 stack *Stack // 虚拟机栈:存储方法调用的栈帧 } // NewThread 创建新线程,初始化虚拟机栈(默认最大深度 1024) func NewThread() *Thread { return &Thread{stack: newStack(1024)} } // PC 获取当前程序计数器的值 func (t *Thread) PC() int { return t.pc } // SetPC 更新程序计数器的值 func (t *Thread) SetPC(pc int) { t.pc = pc } // PushFrame 向虚拟机栈中压入栈帧 func (t *Thread) PushFrame(frame *Frame) { t.stack.push(frame) } // PopFrame 从虚拟机栈中弹出栈帧 func (t *Thread) PopFrame() *Frame { return t.stack.pop() } // CurrentFrame 获取当前正在执行的栈帧(栈顶帧) func (t *Thread) CurrentFrame() *Frame { return t.stack.top() }核心作用:线程是串联所有运行时结构的载体,通过 PC 记录执行位置,通过栈管理方法调用链路。2. 虚拟机栈(Stack):管理方法调用的 “栈结构”虚拟机栈由多个栈帧(Frame)组成,遵循 “先进后出” 原则,用于存储方法调用的状态(如局部变量、操作数等)。package rtda // Stack 虚拟机栈:存储栈帧的链表结构 type Stack struct { maxSize uint // 栈的最大深度(防止栈溢出) size uint // 当前栈深度 _top *Frame // 栈顶帧(当前执行的方法帧) } // push 向栈中压入栈帧,若栈满则抛出 StackOverflowError func (s *Stack) push(frame *Frame) { if s.size >= s.maxSize { panic("java.lang.StackOverflowError") // 模拟 JVM 栈溢出异常 } // 维护栈帧链表关系(新帧的 lower 指向原栈顶) if s._top != nil { frame.lower = s._top } s._top = frame // 更新栈顶为新帧 s.size++ // 栈深度+1 } // pop 从栈中弹出栈帧,若栈空则抛出异常 func (s *Stack) pop() *Frame { if s._top == nil { panic("jvm stack is empty") // 栈空异常 } top := s._top // 记录当前栈顶帧 s._top = top.lower // 更新栈顶为下一个帧 s.size-- // 栈深度-1 return top } // top 获取当前栈顶帧(不弹出) func (s *Stack) top() *Frame { if s._top == nil { panic("jvm stack is empty!") } return s._top } // newStack 创建指定最大深度的虚拟机栈 func newStack(size uint) *Stack { return &Stack{maxSize: size} }核心作用:通过栈帧的压入 / 弹出模拟方法的调用与返回,maxSize 控制栈深度防止溢出(如递归调用过深时触发 StackOverflowError)。3. 栈帧(Frame):方法执行的 “状态容器”栈帧是方法执行的基本单位,每个方法调用对应一个栈帧,包含局部变量表和操作数栈。package rtda // Frame 栈帧:存储方法执行的局部变量和操作数 type Frame struct { lower *Frame // 下一个栈帧(当前方法的调用者帧) localVars LocalVars // 局部变量表:存储方法的参数和局部变量 operandStack *OperandStack // 操作数栈:存储字节码执行的中间结果 } // NewFrame 创建栈帧,需要指定局部变量表大小和操作数栈大小 // (大小从 Class 文件的方法 Code 属性中获取) func NewFrame(maxLocals, maxStack uint) *Frame { return &Frame{ localVars: newLocalVars(maxLocals), // 初始化局部变量表 operandStack: newOperandStack(maxStack), // 初始化操作数栈 } } // LocalVars 获取局部变量表 func (f *Frame) LocalVars() LocalVars { return f.localVars } // OperandStack 获取操作数栈 func (f *Frame) OperandStack() *OperandStack { return f.operandStack }核心作用:栈帧是方法执行的 “快照”,localVars 存储方法的输入(参数和局部变量),operandStack 存储执行过程中的中间结果,两者配合完成字节码指令的计算。4. 局部变量表(LocalVars):存储方法参数和局部变量局部变量表是一个定长数组(槽位集合),用于存储方法的参数和局部变量,索引从 0 开始。package rtda import "math" // Slot 局部变量表和操作数栈的基本存储单元 type Slot struct { num int32 // 存储基本类型数据(int、float 等) ref *Object // 存储引用类型数据(对象指针) } // LocalVars 局部变量表:由 Slot 数组组成 type LocalVars []Slot // newLocalVars 创建指定大小的局部变量表 func newLocalVars(maxSize uint) LocalVars { if maxSize > 0 { return make([]Slot, maxSize) } return nil } // 基本类型存储与读取(int) func (l LocalVars) SetInt(index uint, val int32) { l[index].num = val // int 直接存放在 num 中 } func (l LocalVars) GetInt(index uint) int32 { return l[index].num } // 基本类型存储与读取(float) func (l LocalVars) SetFloat(index uint, val float32) { bits := math.Float32bits(val) // float 转 uint32 存储 l[index].num = int32(bits) } func (l LocalVars) GetFloat(index uint) float32 { bits := uint32(l[index].num) // 取出 uint32 转 float return math.Float32frombits(bits) } // 基本类型存储与读取(long,占 2 个槽位) func (l LocalVars) SetLong(index uint, val int64) { // 低 32 位存 index,高 32 位存 index+1 l[index].num = int32(val) l[index+1].num = int32(val >> 32) } func (l LocalVars) GetLong(index uint) int64 { low := uint32(l[index].num) // 取出低 32 位 high := uint32(l[index+1].num) // 取出高 32 位 return int64(high)<<32 | int64(low) // 合并为 64 位 long } // 基本类型存储与读取(double,占 2 个槽位) func (l LocalVars) SetDouble(index uint, val float64) { bits := math.Float64bits(val) // double 转 uint64 存储 l.SetLong(index, int64(bits)) // 复用 long 的存储逻辑 } func (l LocalVars) GetDouble(index uint) float64 { long := l.GetLong(index) // 复用 long 的读取逻辑 bits := uint64(long) return math.Float64frombits(bits) // 转 float64 } // 引用类型存储与读取 func (l LocalVars) SetRef(index uint, val *Object) { l[index].ref = val // 引用存放在 ref 中 } func (l LocalVars) GetRef(index uint) *Object { return l[index].ref }核心细节:long 和 double 占 2 个槽位,因此存储时需要占用 index 和 index+1,读取时也需从两个槽位合并数据。引用类型通过 ref 字段存储对象指针,指向堆中的实际对象(本章暂不实现堆,用 *Object 占位)。5. 操作数栈(OperandStack):存储字节码执行的中间结果操作数栈是一个动态数组,用于存储字节码指令的操作数和计算结果,遵循 “先进后出” 原则。package rtda import "math" // OperandStack 操作数栈:由 Slot 数组组成,支持 push/pop 操作 type OperandStack struct { size uint // 当前栈深度 slots []Slot // 存储操作数的 Slot 数组 } // newOperandStack 创建指定大小的操作数栈 func newOperandStack(stackSize uint) *OperandStack { if stackSize > 0 { return &OperandStack{slots: make([]Slot, stackSize)} } return nil } // 基本类型入栈/出栈(int) func (o *OperandStack) PushInt(val int32) { o.slots[o.size].num = val o.size++ // 栈深度+1 } func (o *OperandStack) PopInt() int32 { o.size-- // 栈深度-1 return o.slots[o.size].num } // 基本类型入栈/出栈(float) func (o *OperandStack) PushFloat(val float32) { bits := math.Float32bits(val) o.slots[o.size].num = int32(bits) o.size++ } func (o *OperandStack) PopFloat() float32 { o.size-- bits := uint32(o.slots[o.size].num) return math.Float32frombits(bits) } // 基本类型入栈/出栈(long,占 2 个槽位) func (o *OperandStack) PushLong(val int64) { low := int32(val) // 低 32 位 o.slots[o.size].num = low o.size++ high := int32(val >> 32) // 高 32 位 o.slots[o.size].num = high o.size++ // 栈深度+2 } func (o *OperandStack) PopLong() int64 { o.size -= 2 // 栈深度-2 low := uint32(o.slots[o.size].num) high := uint32(o.slots[o.size+1].num) return int64(high)<<32 | int64(low) } // 基本类型入栈/出栈(double,占 2 个槽位) func (o *OperandStack) PushDouble(val float64) { bits := math.Float64bits(val) o.PushLong(int64(bits)) // 复用 long 的入栈逻辑 } func (o *OperandStack) PopDouble() float64 { bits := uint64(o.PopLong()) // 复用 long 的出栈逻辑 return math.Float64frombits(bits) } // 引用类型入栈/出栈 func (o *OperandStack) PushRef(val *Object) { o.slots[o.size].ref = val o.size++ } func (o *OperandStack) PopRef() *Object { o.size-- ref := o.slots[o.size].ref o.slots[o.size].ref = nil // 弹出后清空引用(帮助 GC) return ref }核心细节:操作数栈的 size 字段记录当前栈深度,入栈时 size++,出栈时 size--,确保操作安全。与局部变量表类似,long 和 double 占 2 个槽位,入栈时栈深度 + 2,出栈时 - 2。四、测试运行时数据区功能为验证局部变量表和操作数栈的正确性,我们编写测试代码,模拟基本类型和引用类型的存储与读取。1. 测试代码实现// 修改 startJVM 函数,添加测试逻辑 func startJVM(cmd *Cmd) { // 创建栈帧(局部变量表大小 100,操作数栈大小 100) frame := rtda.NewFrame(100, 100) // 测试局部变量表 testLocalVars(frame.LocalVars()) // 测试操作数栈 testOperandStack(frame.OperandStack()) } // 测试局部变量表的基本类型和引用类型存储 func testLocalVars(vars rtda.LocalVars) { vars.SetInt(0, 100) vars.SetInt(1, -100) vars.SetLong(2, 2997924580) vars.SetLong(4, -2997924580) vars.SetFloat(6, 3.1415926) vars.SetDouble(7, 2.71828182845) vars.SetRef(9, nil) println(vars.GetInt(0)) println(vars.GetInt(1)) println(vars.GetLong(2)) println(vars.GetLong(4)) println(vars.GetFloat(6)) println(vars.GetDouble(7)) println(vars.GetRef(9)) } // 测试操作数栈的基本类型和引用类型入栈/出栈 func testOperandStack(ops *rtda.OperandStack) { ops.PushInt(100) ops.PushInt(-100) ops.PushLong(2997924580) ops.PushLong(-2997924580) ops.PushFloat(3.1415926) ops.PushDouble(2.71828182845) ops.PushRef(nil) println(ops.PopInt()) println(ops.PopInt()) println(ops.PopLong()) println(ops.PopLong()) println(ops.PopFloat()) println(ops.PopDouble()) println(ops.PopRef()) }2. 执行测试与结果验证编译命令:go install ./ch04/执行命令:ch04预期输出:局部变量表和操作数栈的读取结果与存储值一致,无异常报错。本章小结本章实现了 JVM 运行时数据区的核心结构,包括:线程(Thread):通过程序计数器记录执行位置,通过虚拟机栈管理方法调用。虚拟机栈(Stack):通过栈帧的压入 / 弹出模拟方法调用与返回,控制栈深度防止溢出。栈帧(Frame):封装局部变量表和操作数栈,是方法执行的基本单位。局部变量表(LocalVars):存储方法参数和局部变量,支持基本类型和引用类型的存储。操作数栈(OperandStack):存储字节码执行的中间结果,支持基本类型和引用类型的入栈 / 出栈。这些结构是后续执行字节码指令的基础 —— 下一章将实现指令集与解释器,结合运行时数据区执行具体的指令逻辑。源码地址:https://github.com/Jucunqi/jvmgo.git
 -
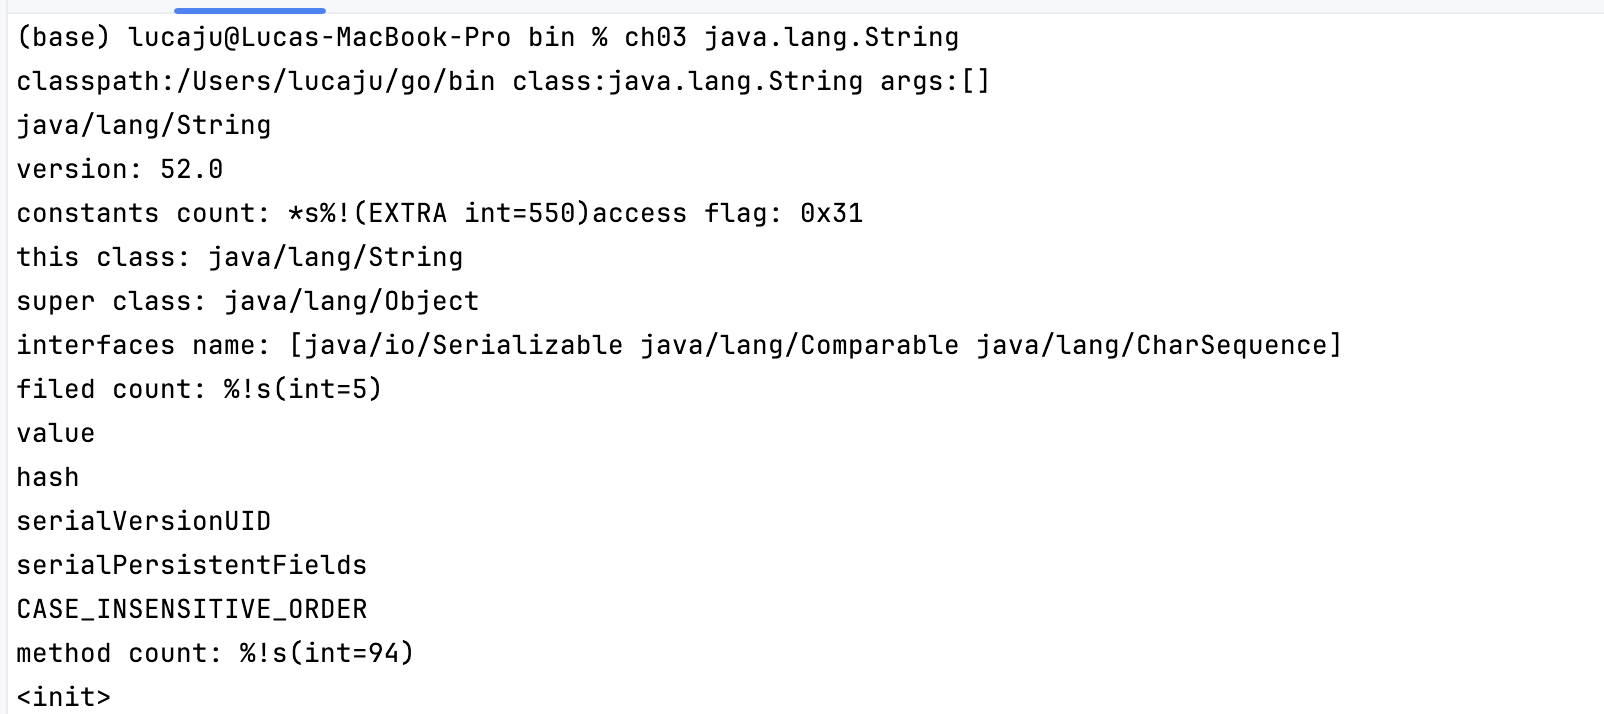
自己动手写 Java 虚拟机笔记 - 第三部分:解析 Class 文件核心结构 前言在前两章中,我们搭建了 JVM 的命令行入口和类路径查找逻辑。本章将深入 Class 文件的二进制结构,实现从字节流到结构化数据的解析,这是 JVM 加载类的核心步骤。参考资料《自己动手写 Java 虚拟机》—— 张秀宏开发环境工具 / 环境版本说明操作系统MacOS 15.5基于 Intel/Apple Silicon 均可JDK1.8用于字节码分析和测试Go 语言1.23.10项目开发主语言第三章:解析 Class 文件Class 文件是 Java 代码编译后的二进制文件,包含类的所有信息(类名、方法、字段、常量等)。JVM 通过解析 Class 文件才能理解并执行 Java 代码。本章将按 Class 文件的结构逐步实现解析逻辑。一、Class 文件整体结构概览Class 文件的结构严格遵循固定格式,通过不同长度的 “无符号整数”(u1/u2/u4 分别表示 1/2/4 字节无符号整数)描述数据。完整结构定义如下:ClassFile { u4 magic; // 魔数,固定值 0xCAFEBABE(验证文件合法性) u2 minor_version; // 次版本号(如 JDK 1.8 的 minor 为 0) u2 major_version; // 主版本号(如 JDK 1.8 的 major 为 52) u2 constant_pool_count; // 常量池大小(索引从 1 开始) cp_info constant_pool[constant_pool_count-1]; // 常量池(存储类中所有常量) u2 access_flags; // 类访问标志(如 public、final、abstract 等) u2 this_class; // 类本身的常量池索引(指向类名) u2 super_class; // 父类的常量池索引(指向父类名) u2 interfaces_count; // 实现的接口数量 u2 interfaces[interfaces_count]; // 接口列表(常量池索引数组) u2 fields_count; // 字段数量 field_info fields[fields_count]; // 字段表(存储类的成员变量信息) u2 methods_count; // 方法数量 method_info methods[methods_count]; // 方法表(存储类的方法信息) u2 attributes_count; // 属性数量 attribute_info attributes[attributes_count]; // 属性表(存储额外信息如代码、行号等) }核心目标:将上述二进制结构解析为 Go 语言中的结构体,便于后续 JVM 加载和执行。二、实现字节流读取工具(ClassReader)Class 文件本质是二进制字节流,我们需要一个工具类来按格式读取不同长度的数据(u1/u2/u4 等)。1. ClassReader 结构体与核心方法package classfile import "encoding/binary" // ClassReader 封装 Class 文件字节流的读取逻辑 type ClassReader struct { data []byte // 存储 Class 文件的二进制数据 } // 读取 1 字节无符号整数(u1) func (c *ClassReader) readUnit8() uint8 { val := c.data[0] // 取当前第一个字节 c.data = c.data[1:] // 移动指针到下一个字节 return val } // 读取 2 字节无符号整数(u2),大端字节序 func (c *ClassReader) readUnit16() uint16 { val := binary.BigEndian.Uint16(c.data) // 大端序解析 2 字节 c.data = c.data[2:] // 移动指针 return val } // 读取 4 字节无符号整数(u4),大端字节序 func (c *ClassReader) readUnit32() uint32 { val := binary.BigEndian.Uint32(c.data) c.data = c.data[4:] return val } // 读取 8 字节无符号整数(u8),大端字节序 func (c *ClassReader) readUnit64() uint64 { val := binary.BigEndian.Uint64(c.data) c.data = c.data[8:] return val } // 读取 u2 数组(先读长度,再读对应数量的 u2) func (c *ClassReader) readUnit16s() []uint16 { length := c.readUnit16() // 数组长度(u2) uint16s := make([]uint16, length) for i := range uint16s { uint16s[i] = c.readUnit16() // 依次读取每个元素 } return uint16s } // 读取指定长度的字节数组 func (c *ClassReader) readBytes(length uint32) []byte { bytes := c.data[:length] // 截取指定长度 c.data = c.data[length:] // 移动指针 return bytes }作用:ClassReader 屏蔽了字节流操作的细节,让上层解析逻辑更简洁,只需调用对应方法即可按格式读取数据。三、解析 Class 文件主结构(ClassFile)ClassFile 结构体对应 Class 文件的整体结构,负责协调解析魔数、版本号、常量池、字段、方法等核心部分。1. ClassFile 结构体定义package classfile import "fmt" // ClassFile 存储解析后的 Class 文件信息 type ClassFile struct { magic uint32 // 魔数(0xCAFEBABE) minorVersion uint16 // 次版本号 majorVersion uint16 // 主版本号 constantPool ConstantPool // 常量池(核心数据结构) accessFlags uint16 // 类访问标志 thisClass uint16 // 当前类的常量池索引 superClass uint16 // 父类的常量池索引 interfaces []uint16 // 接口索引列表 fields []*MemberInfo // 字段列表 methods []*MemberInfo // 方法列表 attributes []AttributeInfo // 属性列表 }2. 核心解析逻辑(Parse 方法)// Parse 从字节流解析 Class 文件 func Parse(classData []byte) (cf *ClassFile, err error) { // 捕获解析过程中的 panic(如格式错误),转为 error 返回 defer func() { if r := recover(); r != nil { var ok bool err, ok = r.(error) if !ok { err = fmt.Errorf("%v", r) // 非 error 类型的 panic 转为 error } } }() cr := &ClassReader{classData} // 创建字节流读取器 cf = &ClassFile{} cf.read(cr) // 开始解析 return } // read 按 Class 文件结构依次解析各部分 func (c *ClassFile) read(reader *ClassReader) { c.readAndCheckMagic(reader) // 验证魔数 c.readAndCheckVersion(reader) // 验证版本号 c.constantPool = readConstantPool(reader) // 解析常量池 c.accessFlags = reader.readUnit16() // 读取访问标志 c.thisClass = reader.readUnit16() // 读取当前类索引 c.superClass = reader.readUnit16() // 读取父类索引 c.interfaces = reader.readUnit16s() // 读取接口列表 c.fields = readMembers(reader, c.constantPool) // 解析字段 c.methods = readMembers(reader, c.constantPool) // 解析方法 c.attributes = readAttributes(reader, c.constantPool) // 解析属性 }3. 关键验证步骤魔数验证:确保文件是合法的 Class 文件(固定为 0xCAFEBABE)。func (c *ClassFile) readAndCheckMagic(reader *ClassReader) { magic := reader.readUnit32() if magic != 0xCAFEBABE { panic("java.lang.ClassFormatError: invalid magic number") } }版本号验证:JVM 只支持特定版本的 Class 文件(如 JDK 1.8 支持 45.0 ~ 52.0 版本)。func (c *ClassFile) readAndCheckVersion(reader *ClassReader) { c.minorVersion = reader.readUnit16() c.majorVersion = reader.readUnit16() // 支持 JDK 1.0.2(45.0)到 JDK 1.8(52.0)的版本 switch c.majorVersion { case 45: return // JDK 1.0.2 case 46, 47, 48, 49, 50, 51, 52: if c.minorVersion == 0 { return // JDK 1.1 ~ 1.8 } } panic("java.lang.UnsupportedClassVersionError") }四、解析常量池(ConstantPool)常量池是 Class 文件中最复杂的部分,存储类中所有常量(字符串、类名、方法名、字段名等),是解析其他结构的基础。1. 常量池结构与类型常量池由多个 cp_info 结构组成,每个结构以 tag 字段标识类型(共 17 种,如字符串、类引用、方法引用等)。核心类型如下:tag 值常量类型作用1ConstantUtf8Info存储 UTF-8 字符串(如类名、方法名)7ConstantClassInfo类或接口的引用(指向 UTF-8 类名)10ConstantMethodRefInfo方法引用(指向类和方法描述符)12ConstantNameAndTypeInfo名称和类型描述符(字段 / 方法的元信息)2. 常量池解析逻辑package classfile // ConstantPool 常量池(本质是常量接口数组) type ConstantPool []ConstantInfo // 读取常量池 func readConstantPool(reader *ClassReader) ConstantPool { cpCount := int(reader.readUnit16()) // 常量池大小(索引从 1 开始) cp := make([]ConstantInfo, cpCount) for i := 1; i < cpCount; i++ { cp[i] = readConstantInfo(reader, cp) // 解析单个常量 // 注意:Long 和 Double 类型占 2 个索引位置 switch cp[i].(type) { case *ConstantLongInfo, *ConstantDoubleInfo: i++ // 跳过下一个索引 } } return cp } // 从常量池获取指定索引的常量 func (c ConstantPool) getConstantInfo(index uint16) ConstantInfo { if cpInfo := c[index]; cpInfo != nil { return cpInfo } panic("invalid constant pool index") } // 工具方法:通过索引获取类名(从 ConstantClassInfo 中解析) func (c ConstantPool) getClassName(index uint16) string { classInfo := c.getConstantInfo(index).(*ConstantClassInfo) return c.getUtf8(classInfo.nameIndex) // 类名存储在 UTF-8 常量中 } // 工具方法:通过索引获取 UTF-8 字符串 func (c ConstantPool) getUtf8(index uint16) string { utf8Info := c.getConstantInfo(index).(*ConstantUtf8Info) return utf8Info.str }关键设计:通过 ConstantInfo 接口抽象不同类型的常量,每种常量类型实现接口的 readInfo 方法,实现多态解析。五、解析字段和方法(MemberInfo)字段(Field)和方法(Method)的结构相似,都包含访问标志、名称索引、描述符索引和属性列表,因此可以用同一个 MemberInfo 结构体封装。1. MemberInfo 结构体package classfile // MemberInfo 封装字段或方法的信息 type MemberInfo struct { cp ConstantPool // 常量池(用于解析名称和描述符) accessFlags uint16 // 访问标志(如 public、private、static 等) nameIndex uint16 // 名称的常量池索引(字段名/方法名) descriptorIndex uint16 // 描述符的常量池索引(类型信息) attributes []AttributeInfo // 属性列表(如字段的常量值、方法的代码等) } // 读取字段或方法列表 func readMembers(reader *ClassReader, cp ConstantPool) []*MemberInfo { memberCount := reader.readUnit16() // 成员数量 members := make([]*MemberInfo, memberCount) for i := range members { members[i] = readMember(reader, cp) // 解析单个成员 } return members } // 读取单个字段或方法 func readMember(reader *ClassReader, cp ConstantPool) *MemberInfo { return &MemberInfo{ cp: cp, accessFlags: reader.readUnit16(), nameIndex: reader.readUnit16(), descriptorIndex: reader.readUnit16(), attributes: readAttributes(reader, cp), } } // 工具方法:获取字段/方法名称 func (m *MemberInfo) Name() string { return m.cp.getUtf8(m.nameIndex) } // 工具方法:获取字段/方法描述符(如 "Ljava/lang/String;" 表示字符串类型) func (m *MemberInfo) Descriptor() string { return m.cp.getUtf8(m.descriptorIndex) }示例:解析 java.lang.String 类的方法时,nameIndex 指向常量池中的 "length" 字符串,descriptorIndex 指向 "()I"(表示无参、返回 int 的方法)。六、解析属性(AttributeInfo)属性是 Class 文件中存储额外信息的结构,不同属性有不同的格式(如方法的字节码存储在 Code 属性中,行号映射存储在 LineNumberTable 属性中)。1. 属性接口与解析逻辑package classfile // AttributeInfo 属性接口(所有属性类型都需实现此接口) type AttributeInfo interface { readInfo(reader *ClassReader) // 读取属性具体内容 } // 读取属性列表 func readAttributes(reader *ClassReader, cp ConstantPool) []AttributeInfo { attributeCount := reader.readUnit16() // 属性数量 attributes := make([]AttributeInfo, attributeCount) for i := range attributes { attributes[i] = readAttribute(reader, cp) // 解析单个属性 } return attributes } // 读取单个属性(根据属性名创建对应类型的实例) func readAttribute(reader *ClassReader, cp ConstantPool) AttributeInfo { attrNameIndex := reader.readUnit16() // 属性名的常量池索引 attrName := cp.getUtf8(attrNameIndex) // 获取属性名(如 "Code"、"SourceFile") attrLen := reader.readUnit32() // 属性长度(内容字节数) attribute := newAttribute(attrName, attrLen, cp) // 创建属性实例 attribute.readInfo(reader) // 读取属性内容 return attribute } // 根据属性名创建对应类型的实例 func newAttribute(attrName string, attrLen uint32, cp ConstantPool) AttributeInfo { switch attrName { case "Code": return &CodeAttribute{cp: cp} // 方法的字节码属性 case "ConstantValue": return &ConstantValueAttribute{} // 字段的常量值属性 case "Exceptions": return &ExceptionAttribute{} // 方法抛出的异常属性 case "LineNumberTable": return &LineNumberTableAttribute{} // 字节码与行号映射属性 case "SourceFile": return &SourceFileAttribute{cp: cp} // 源文件名属性 default: // 未实现的属性用 UnparsedAttribute 存储原始数据 return &UnparsedAttribute{attrName, attrLen, nil} } }核心属性示例:Code 属性:存储方法的字节码指令、操作数栈大小、局部变量表大小等核心执行信息。SourceFile 属性:记录类对应的源文件名(如 String.java)。七、测试解析逻辑1. 修改启动函数验证解析结果在 main.go 中添加加载类并打印解析结果的逻辑:func startJVM(cmd *Cmd) { // 解析类路径 cp := classpath.Parse(cmd.xJreOption, cmd.cpOption) // 加载类(如 java.lang.String) classname := strings.ReplaceAll(cmd.class, ".", "/") // 转为类文件路径(如 "java/lang/String") class := loadClass(classname, cp) printClass(class) // 打印解析结果 } // 打印类的核心信息 func printClass(cf *classfile.ClassFile) { fmt.Printf("version: %v.%v\n", cf.MajorVersion(), cf.MinorVersion()) fmt.Printf("constants count: *s", len(cf.ConstantPool())) fmt.Printf("access flag: 0x%x\n", cf.AccessFlags()) fmt.Printf("this class: %s\n", cf.ClassName()) fmt.Printf("super class: %s\n", cf.SuperClassName()) fmt.Printf("interfaces name: %s\n", cf.InterfaceNames()) fmt.Printf("filed count: %s\n", len(cf.Fields())) for _, field := range cf.Fields() { fmt.Printf("%s\n", field.Name()) } fmt.Printf("method count: %s\n", len(cf.Methods())) for _, method := range cf.Methods() { fmt.Printf("%s\n", method.Name()) } }2. 执行测试并验证结果编译命令:go install ./ch03/执行命令:ch03 java.lang.String预期输出:打印 java.lang.String 类的版本号、类名、父类名(java.lang.Object)、字段(如 value)、方法(如 length、equals)等信息。本章小结本章完成了 Class 文件的核心解析逻辑,重点包括:用 ClassReader 封装字节流读取,按格式解析 u1/u2/u4 等数据;实现 ClassFile 结构体,按固定结构解析魔数、版本号、常量池等核心部分;通过接口抽象常量池和属性的多态解析,适配不同类型的常量和属性;用 MemberInfo 统一封装字段和方法的解析逻辑。下一章将基于解析后的 Class 文件信息,实现运行时数据区,进一步理解JVM内部的奥秘。源码地址:https://github.com/Jucunqi/jvmgo.git
-
自己动手写 Java 虚拟机笔记 - 第二部分:搜索 Class 文件 前言为什么要自己实现 JVM?兴趣驱动:想深入理解 "Write once, run anywhere" 的底层逻辑,跳出 "API 调用程序员" 的舒适区,亲手剖析 JVM 的核心原理。填补空白:目前网上关于 JVM 实现的资料中,针对 Mac 平台的实践较少,希望通过这份笔记给同类需求的开发者提供参考。为什么选择 Go 语言?开发效率优势:相比 C/C++,Go 语言语法简洁、内存管理更友好,能降低开发门槛,让精力更聚焦于 JVM 核心功能的实现逻辑。学习双赢:借这个项目系统学习 Go 语言,在实践中掌握并发、指针、接口等特性。参考资料《自己动手写 Java 虚拟机》—— 张秀宏(核心参考书籍,推荐对 JVM 实现感兴趣的同学阅读)开发环境工具 / 环境版本说明操作系统MacOS 15.5基于 Intel/Apple Silicon 均可JDK1.8用于字节码分析和测试Go 语言1.23.10项目开发主语言第二章 搜索 Class 文件在 JVM 的执行流程中,第一步就是根据类名找到对应的 Class 文件并读取其内容。本章将实现 Class 文件的搜索逻辑,核心是解析类路径(classpath),并根据路径类型(目录、JAR 包等)加载 Class 文件。一、解析 JRE 路径:获取基础类库位置JVM 运行时依赖 JRE 中的基础类库(如java.lang.Object等核心类),因此需要先确定 JRE 的位置。我们通过命令行参数-Xjre接收用户指定的 JRE 路径,若未指定则自动查找系统默认 JRE。1.1 扩展命令行参数解析修改cmd.go,新增-Xjre参数的解析逻辑,用于接收 JRE 路径:// 命令行选项和参数结构体 type Cmd struct { // ... 省略其他字段 xJreOption string // 存储-Xjre参数的值 } // 解析命令行参数,赋值到Cmd结构体 func parseCmd() *Cmd { cmd := &Cmd{} flag.Usage = printUsage // 解析基础参数 flag.BoolVar(&cmd.helpFlag, "help", false, "print help message") flag.BoolVar(&cmd.helpFlag, "?", false, "print help message") flag.BoolVar(&cmd.versionFlag, "version", false, "print version and exit") flag.StringVar(&cmd.cpOption, "cp", "", "classpath") // 新增:解析-Xjre参数 flag.StringVar(&cmd.xJreOption, "Xjre", "", "path to jre") flag.Parse() // ... 省略后续逻辑 return cmd }说明:-Xjre是 JVM 的非标准选项(以-X开头),用于指定 JRE 的根目录,优先级高于系统默认 JRE 路径。1.2 自动查找 JRE 路径若用户未指定-Xjre,需要自动查找系统默认 JRE。在 MacOS 上,可通过以下逻辑实现(补充getJreDir函数):// 获取JRE目录(简化版) func getJreDir(jreOption string) string { // 1. 优先使用用户指定的-Xjre参数 if jreOption != "" && exists(jreOption) { return jreOption } // 2. 查找当前Java_home下的JRE if javaHome := os.Getenv("JAVA_HOME"); javaHome != "" { jreDir := filepath.Join(javaHome, "jre") if exists(jreDir) { return jreDir } } // 3. 尝试当前目录下的jre文件夹 if exists("./jre") { return "./jre" } // 4. 若都找不到,抛出错误 panic("can not find jre directory") } // 辅助函数:判断路径是否存在 func exists(path string) bool { _, err := os.Stat(path) return err == nil || os.IsExist(err) }核心逻辑:JRE 路径的查找优先级为 “用户指定> JAVA_HOME 下的 jre > 当前目录 jre”,确保在大多数环境下能正确定位基础类库。二、设计 Entry 接口:统一 Class 文件读取逻辑Class 文件可能存在于目录、JAR 包、ZIP 包等不同位置,为了统一读取逻辑,我们定义Entry接口,抽象不同存储介质的 Class 文件读取行为。2.1 Entry 接口定义const pathListSeparator = string(os.PathListSeparator) // 路径分隔符(Mac/Linux为:,Windows为;) // Entry接口:定义Class文件读取规范 type Entry interface { // 读取类文件:返回类字节码、当前Entry实例、错误信息 readClass(name string) ([]byte, Entry, error) // 字符串表示:返回当前Entry的路径描述 String() string }接口作用:无论 Class 文件在目录还是 JAR 包中,都通过readClass方法读取,调用者无需关心底层存储细节。2.2 Entry 的实现类根据 Class 文件的存储位置,Entry有 4 种实现,覆盖所有常见场景:实现类适用场景示例路径DirEntry目录中的 Class 文件/Users/dev/classesZipEntryJAR/ZIP 包中的 Class 文件/Users/dev/lib/tools.jarWildcardEntry通配符匹配的多个 JAR/ZIP 包/Users/dev/lib/*CompositeEntry多个路径(用分隔符分隔)./classes:/Users/dev/lib/*2.2.1 工厂方法:创建 Entry 实例通过newEntry函数根据路径自动选择合适的实现类,简化调用:// 根据路径创建对应的Entry实例 func newEntry(path string) Entry { // 1. 处理多路径(含分隔符) if strings.Contains(path, pathListSeparator) { return newCompositeEntry(path) } // 2. 处理通配符路径(以*结尾) if strings.HasSuffix(path, "*") { return newWildcardEntry(path) } // 3. 处理JAR/ZIP包 if strings.HasSuffix(path, ".jar") || strings.HasSuffix(path, ".JAR") || strings.HasSuffix(path, ".zip") || strings.HasSuffix(path, ".ZIP") { return newZipEntry(path) } // 4. 默认视为目录 return newDirEntry(path) }设计思路:通过工厂模式隐藏具体实现类的创建细节,调用者只需传入路径即可获得可用的Entry实例。三、Classpath 类:管理完整类路径JVM 的类路径由三部分组成:启动类路径(boot classpath)、扩展类路径(ext classpath)、用户类路径(user classpath)。Classpath类负责管理这三部分路径的解析和使用。3.1 Classpath 结构定义package classpath import ( "os" "path/filepath" ) // Classpath:管理完整的类路径 type Classpath struct { bootClasspath Entry // 启动类路径(如JRE/lib下的类) extClasspath Entry // 扩展类路径(如JRE/lib/ext下的类) userClasspath Entry // 用户类路径(-cp指定或默认当前目录) }3.2 解析类路径3.2.1 解析启动类和扩展类路径启动类路径包含 JVM 运行必需的核心类(如java.lang包下的类),扩展类路径包含系统扩展类,两者均位于 JRE 目录中:// 解析启动类路径和扩展类路径 func (c *Classpath) parseBootAndExtClasspath(jreOption string) { jreDir := getJreDir(jreOption) // 先获取JRE目录 // 启动类路径:JRE/lib/*(匹配所有JAR包和类目录) jreLibPath := filepath.Join(jreDir, "lib", "*") c.bootClasspath = newWildcardEntry(jreLibPath) // 扩展类路径:JRE/lib/ext/* jreExtPath := filepath.Join(jreDir, "lib", "ext", "*") c.extClasspath = newWildcardEntry(jreExtPath) }说明:JRE/lib/*会匹配该目录下所有 JAR 包(如rt.jar是核心类库),确保能加载基础类。3.2.2 解析用户类路径用户类路径由-cp参数指定(若未指定则默认当前目录),用于加载应用程序自身的类:// 解析用户类路径 func (c *Classpath) parseUserClasspath(cpOption string) { if cpOption == "" { cpOption = "." // 默认当前目录 } c.userClasspath = newEntry(cpOption) }3.3 统一读取 Class 文件Classpath提供ReadClass方法,按优先级(用户类路径 → 扩展类路径 → 启动类路径)查找并读取 Class 文件:// 读取Class文件:按用户类路径→扩展类路径→启动类路径的顺序查找 func (c *Classpath) ReadClass(name string) ([]byte, Entry, error) { name = name + ".class" // 补充.class后缀 // 1. 先从用户类路径查找 if data, entry, err := c.userClasspath.readClass(name); err == nil { return data, entry, nil } // 2. 再从扩展类路径查找 if data, entry, err := c.extClasspath.readClass(name); err == nil { return data, entry, nil } // 3. 最后从启动类路径查找 return c.bootClasspath.readClass(name) }优先级说明:用户类路径优先级最高,避免自定义类覆盖核心类;启动类路径优先级最低,确保核心类不被意外替换。四、测试验证:读取 Class 文件修改main.go的startJVM函数,验证 Classpath 是否能正确读取 Class 文件:func startJVM(cmd *Cmd) { // 解析类路径 cp := classpath.NewClasspath(cmd.xJreOption, cmd.cpOption) fmt.Printf("classpath: %v\n", cp) // 转换类名为路径格式(如java.lang.Object → java/lang/Object) classname := strings.ReplaceAll(cmd.class, ".", "/") // 读取Class文件 data, entry, err := cp.ReadClass(classname) if err != nil { fmt.Printf("Could not find or load main class %s: %v\n", cmd.class, err) return } // 输出类的内容 fmt.Printf("class data:%v\n", data) }测试步骤与结果编译安装:go install ./ch02/执行测试:读取java.lang.Object类(JRE 核心类)ch02 java.lang.String输出结果:结果说明:成功从 JRE 的rt.jar中读取到java.lang.String类的字节码,验证了类路径解析和 Class 文件读取逻辑的正确性。五、小结本章实现了 JVM 搜索 Class 文件的核心逻辑,关键知识点:类路径组成:启动类路径、扩展类路径、用户类路径的分层设计,确保类加载的优先级和安全性。Entry 接口:通过接口抽象不同存储介质的 Class 文件读取行为,简化上层调用。路径解析:支持目录、JAR 包、通配符等多种路径格式,兼容 Java 的类路径规范。下一章将基于本章的 Class 文件读取功能,实现 Class 文件的解析,提取常量池、类信息、方法等关键数据。源码地址:https://github.com/Jucunqi/jvmgo.git
-
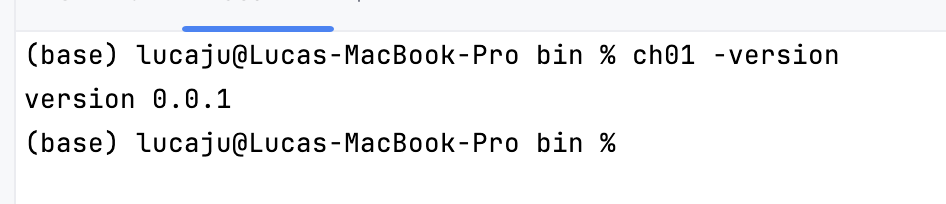
自己动手写 Java 虚拟机笔记 - 第一部分:从零搭建命令行工具 前言为什么要自己实现 JVM?兴趣驱动:想深入理解 "Write once, run anywhere" 的底层逻辑,跳出 "API 调用程序员" 的舒适区,亲手剖析 JVM 的核心原理。填补空白:目前网上关于 JVM 实现的资料中,针对 Mac 平台的实践较少,希望通过这份笔记给同类需求的开发者提供参考。为什么选择 Go 语言?开发效率优势:相比 C/C++,Go 语言语法简洁、内存管理更友好,能降低开发门槛,让精力更聚焦于 JVM 核心功能的实现逻辑。学习双赢:借这个项目系统学习 Go 语言,在实践中掌握并发、指针、接口等特性。参考资料《自己动手写 Java 虚拟机》—— 张秀宏(核心参考书籍,推荐对 JVM 实现感兴趣的同学阅读)开发环境工具 / 环境版本说明操作系统MacOS 15.5基于 Intel/Apple Silicon 均可JDK1.8用于字节码分析和测试Go 语言1.23.10项目开发主语言第一章:实现 JVM 命令行工具命令行工具是 JVM 的入口,负责解析参数、配置运行环境,本章将从零搭建一个基础的命令行参数解析器。一、环境准备1. JDK 1.8 安装与配置从 Oracle 官网 或 AdoptOpenJDK 下载 JDK 1.8 安装包。配置环境变量(以 Mac 为例):在 ~/.bash_profile 或 ~/.zshrc 中添加:export JAVA_HOME=/Library/Java/JavaVirtualMachines/jdk1.8.0_xxx.jdk/Contents/Home export PATH=$JAVA_HOME/bin:$PATH执行 source ~/.zshrc 生效,通过 java -version 验证安装成功。2. Go 1.23.10 安装与配置从 Go 官网 下载对应版本安装包,或通过 Homebrew 安装:brew install go@1.23。配置环境变量:export GOROOT=/usr/local/opt/go@1.23/libexec # 取决于安装路径 export GOPATH=$HOME/go # 自定义工作目录 export PATH=$GOROOT/bin:$GOPATH/bin:$PATH执行 go version 验证安装成功。二、命令行工具核心代码实现1. 定义命令行参数结构(cmd.go)该文件负责解析命令行参数,如类路径、主类名、帮助 / 版本信息等。package main import ( "flag" "fmt" "os" ) // Cmd 存储命令行参数解析结果 type Cmd struct { helpFlag bool // 是否显示帮助信息 versionFlag bool // 是否显示版本信息 cpOption string // 类路径(classpath) class string // 要执行的主类名 args []string // 传递给主类的参数 } // parseCmd 解析命令行参数并返回 Cmd 实例 func parseCmd() *Cmd { cmd := &Cmd{} // 自定义帮助信息打印函数 flag.Usage = printUsage // 绑定命令行选项到 Cmd 字段 flag.BoolVar(&cmd.helpFlag, "help", false, "print help message") flag.BoolVar(&cmd.helpFlag, "?", false, "print help message") // 支持 -? 作为帮助选项 flag.BoolVar(&cmd.versionFlag, "version", false, "print version and exit") flag.BoolVar(&cmd.versionFlag, "v", false, "print version and exit") // 支持 -v 作为版本选项 flag.StringVar(&cmd.cpOption, "cp", "", "classpath") // 类路径选项 // 解析参数 flag.Parse() // 获取非选项参数(主类名和程序参数) args := flag.Args() if len(args) > 0 { cmd.class = args[0] // 第一个参数为主类名 cmd.args = args[1:] // 后续参数传递给主类 } return cmd } // printUsage 打印命令行使用帮助 func printUsage() { fmt.Printf("Usage: %s [-options] class [args...]\n", os.Args[0]) }2. 程序主入口(main.go)主函数根据解析后的参数决定执行逻辑,如打印版本、显示帮助或启动 JVM。package main import "fmt" // main 程序入口函数 func main() { cmd := parseCmd() // 解析命令行参数 // 根据参数执行对应逻辑 if cmd.versionFlag { fmt.Println("version 0.0.1") // 版本信息 } else if cmd.helpFlag || cmd.class == "" { printUsage() // 显示帮助或主类名为空时提示用法 } else { startJVM(cmd) // 启动 JVM(本章仅打印参数,后续章节实现核心逻辑) } } // startJVM 模拟 JVM 启动(本章仅打印参数) func startJVM(cmd *Cmd) { fmt.Printf("classpath: %s\nclass: %s\nargs: %v\n", cmd.cpOption, cmd.class, cmd.args) }三、编译与测试1. 编译代码在项目目录下执行编译命令,生成可执行文件:go install ./ch01 # 假设代码放在 ch01 目录下编译成功后,可执行文件会生成在 $GOPATH/bin 目录下(如 ch01)。2. 测试命令行功能查看版本:ch01 -v # 输出:version 0.0.1查看帮助:ch01 -help # 输出:Usage: ch01 [-options] class [args...]测试参数解析:ch01 -cp ./classes com.example.Main arg1 arg2 # 输出: # classpath: ./classes # class: com.example.Main # args: [arg1 arg2]本章小结本章完成了 JVM 命令行工具的基础实现,核心功能包括:解析命令行选项(-help、-version、-cp 等);提取主类名和程序参数;提供基础的参数校验和帮助提示。下一章将基于此,实现类路径的查找逻辑和类加载的核心流程,逐步构建完整的 JVM 骨架。源码地址:https://github.com/Jucunqi/jvmgo.git
-
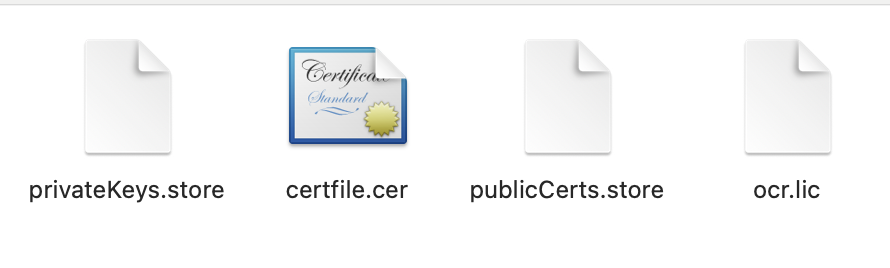
自定义 Spring-Boot-Starter 结合 TrueLicense 实现证书授权拦截 引言在软件产品交付场景中,授权管理是保障软件权益的重要手段。传统的硬编码时间限制方式存在修改麻烦、需重新部署等问题,而基于证书(License)的授权方式可通过替换证书文件实现灵活授权,无需改动源码。本文将详解如何基于 Spring Boot 自定义 Starter,并整合开源证书管理引擎 TrueLicense,实现对接口的证书授权拦截功能,帮助开发者快速搭建可控的授权体系。一、技术背景与场景说明1.1 什么是 TrueLicense?TrueLicense 是一个基于 Java 的开源证书管理引擎,提供了证书的生成、颁发、验证等核心功能,支持通过密钥对加密证书内容,确保授权信息的安全性。其官网地址为:https://truelicense.java.net。1.2 为什么需要自定义 Spring Boot Starter?Spring Boot Starter 的核心作用是简化依赖管理和自动配置。通过自定义 Starter,我们可以将证书校验逻辑封装为独立组件,只需在目标项目中引入依赖并配置参数,即可快速集成证书授权功能,实现 "即插即用"。1.3 核心场景软件试用期授权:通过证书指定有效期,到期后自动限制使用。硬件绑定授权:限制软件仅能在指定 MAC 地址的设备上运行。接口级授权控制:对敏感接口添加证书校验,未授权请求直接拦截。二、密钥对生成(基于 keytool)证书的安全性依赖于非对称加密的密钥对(私钥用于生成证书,公钥用于验证证书)。我们使用 JDK 自带的keytool工具生成密钥对,步骤如下:2.1 生成私钥库私钥库用于存储生成证书的私钥,执行以下命令:keytool -genkey -alias privatekey -keystore privateKeys.store -storepass "123456q" -keypass "123456q" -keysize 1024 -validity 3650参数说明:-alias privatekey:私钥别名(后续生成证书需引用)。-keystore privateKeys.store:生成的私钥库文件名。-storepass "123456q":私钥库访问密码。-keypass "123456q":私钥本身的密码(建议与 storepass 一致,简化管理)。-keysize 1024:密钥长度(1024 位及以上确保安全性)。-validity 3650:私钥有效期(单位:天,此处为 10 年)。执行后需输入所有者信息(如姓名、组织等),可根据实际情况填写。2.2 导出公钥证书从私钥库中导出公钥证书(用于校验证书的合法性):keytool -export -alias privatekey -file certfile.cer -keystore privateKeys.store -storepass "123456q"参数说明:-export:指定操作类型为导出证书。-file certfile.cer:导出的公钥证书文件名。执行成功后,当前目录会生成certfile.cer公钥文件。2.3 导入公钥到公钥库将公钥证书导入公钥库(供应用程序验证证书时使用):keytool -import -alias publiccert -file certfile.cer -keystore publicCerts.store -storepass "123456q"参数说明:-alias publiccert:公钥在公钥库中的别名(后续校验需引用)。-keystore publicCerts.store:生成的公钥库文件名。执行时需确认导入(输入yes),完成后公钥库publicCerts.store生成。注意:私钥库(privateKeys.store)需妥善保管,公钥库(publicCerts.store)和公钥证书(certfile.cer)可随应用程序部署。三、证书生成工具实现基于 TrueLicense 的 API,我们可以通过代码生成证书文件。以下是核心实现步骤:3.1 核心参数类定义首先定义证书生成所需的参数封装类(LicenseCreatorParam):/** * License证书生成类需要的参数 * @author : jucunqi * @since : 2025/3/12 */ @Data public class LicenseCreatorParam implements Serializable { private static final long serialVersionUID = 2832129012982731724L; /** * 证书subject * */ private String subject; /** * 密钥级别 * */ private String privateAlias; /** * 密钥密码(需要妥善保存,密钥不能让使用者知道) */ private String keyPass; /** * 访问密钥库的密码 * */ private String storePass; /** * 证书生成路径 * */ private String licensePath; /** * 密钥库存储路径 * */ private String privateKeysStorePath; /** * 证书生效时间 * */ @JsonFormat(pattern = "yyyy-MM-dd HH:mm:ss", timezone = "GMT+8") private Date issuedTime = new Date(); /** * 证书的失效时间 * */ @JsonFormat(pattern = "yyyy-MM-dd HH:mm:ss", timezone = "GMT+8") private Date expiryTime; /** * 用户的使用类型 * */ private String consumerType ="user"; /** * 用户使用数量 * */ private Integer consumerAmount = 1; /** * 描述信息 * */ private String description = ""; /** * 额外的服务器硬件校验信息(机器码) * */ private LicenseCheckModel licenseCheckModel; }/** * 自定义需要校验的参数 * @author : jucunqi * @since : 2025/3/12 */ @Data public class LicenseCheckModel implements Serializable { private static final long serialVersionUID = -2314678441082223148L; /** * 可被允许IP地址白名单 * */ private List<String> ipAddress; /** * 可被允许的MAC地址白名单(网络设备接口的物理地址,通常固化在网卡(Network Interface Card,NIC)的EEPROM(电可擦可编程只读存储器)中,具有全球唯一性。) * */ private List<String> macAddress; /** * 可允许的CPU序列号 * */ private String cpuSerial; /** * 可允许的主板序列号(硬件序列化?) * */ private String mainBoardSerial; }3.2 证书生成器实现实现LicenseCreator类,封装证书生成逻辑:public class LicenseCreator { private final static X500Principal DEFAULT_HOLDER_AND_ISSUER = new X500Principal("CN=localhost, OU=localhost, O=localhost, L=SH, ST=SH, C=CN"); private final LicenseCreatorParam param; public LicenseCreator(LicenseCreatorParam param) { this.param = param; } /** * 生成License证书 * @return boolean */ public boolean generateLicense(){ try { LicenseManager licenseManager = new CustomLicenseManager(initLicenseParam()); LicenseContent licenseContent = initLicenseContent(); licenseManager.store(licenseContent,new File(param.getLicensePath())); return true; }catch (Exception e){ throw new LicenseCreateException(MessageFormat.format("证书生成失败:{0}", param), e); } } /** * 初始化证书生成参数 * @return de.schlichtherle.license.LicenseParam */ private LicenseParam initLicenseParam(){ Preferences preferences = Preferences.userNodeForPackage(LicenseCreator.class); //设置对证书内容加密的秘钥 CipherParam cipherParam = new DefaultCipherParam(param.getStorePass()); KeyStoreParam privateStoreParam = new CustomKeyStoreParam(LicenseCreator.class ,param.getPrivateKeysStorePath() ,param.getPrivateAlias() ,param.getStorePass() ,param.getKeyPass()); return new DefaultLicenseParam(param.getSubject() ,preferences ,privateStoreParam ,cipherParam); } /** * 设置证书生成正文信息 * @return de.schlichtherle.license.LicenseContent */ private LicenseContent initLicenseContent(){ LicenseContent licenseContent = new LicenseContent(); licenseContent.setHolder(DEFAULT_HOLDER_AND_ISSUER); licenseContent.setIssuer(DEFAULT_HOLDER_AND_ISSUER); licenseContent.setSubject(param.getSubject()); licenseContent.setIssued(param.getIssuedTime()); licenseContent.setNotBefore(param.getIssuedTime()); licenseContent.setNotAfter(param.getExpiryTime()); licenseContent.setConsumerType(param.getConsumerType()); licenseContent.setConsumerAmount(param.getConsumerAmount()); licenseContent.setInfo(param.getDescription()); //扩展校验服务器硬件信息 licenseContent.setExtra(param.getLicenseCheckModel()); return licenseContent; } }3.3 生成证书示例通过单元测试或主方法生成证书:public class LicenseCreateTest { public static void main(String[] args) { LicenseCreatorParam param = new LicenseCreatorParam(); param.setSubject("your subject"); param.setPrivateAlias("privatekey"); // 与私钥库中别名一致 param.setKeyPass("123456q"); // 私钥密码 param.setStorePass("123456q"); // 私钥库密码 param.setLicensePath("your path"); // 证书输出路径 param.setPrivateKeysStorePath("your path"); // 私钥库路径 param.setIssuedTime(DateUtil.parseDate("2025-05-25")); // 生效时间 param.setExpiryTime(DateUtil.parseDate("2025-09-01")); // 过期时间 param.setConsumerType("your type"); param.setConsumerAmount(1); param.setDescription("your desc"); // 绑定MAC地址(仅允许指定设备使用) LicenseCheckModel checkModel = new LicenseCheckModel(); checkModel.setMacAddressList(Collections.singletonList("8c:84:74:e7:62:a6")); param.setLicenseCheckModel(checkModel); // 生成证书 LicenseCreator creator = new LicenseCreator(param); boolean result = creator.generateLicense(); System.out.println("证书生成结果:" + (result ? "成功" : "失败")); } }执行后,指定路径会生成your path.lic证书文件。四、证书校验核心逻辑应用程序需通过公钥库验证证书的合法性(有效期、设备绑定等),核心实现如下:4.1 校验参数类定义/** * license证书校验参数类 * @author : jucunqi * @since : 2025/3/12 */ @Data public class LicenseVerifyParam { /** * 证书subject */ private String subject; /** * 公钥别称 */ private String publicAlias; /** * 访问公钥库的密码 */ private String storePass; /** * 证书生成路径 */ private String licensePath; /** * 密钥库存储路径 */ private String publicKeysStorePath; }4.2 校验器实现/** * license证书校验类 * @author : jucunqi * @since : 2025/3/12 */ @Slf4j public class LicenseVerify { /** * 认证需要提供的参数 */ private final LicenseVerifyParam param; /** * 是否启用license */ private final Boolean enableLicense; public LicenseVerify(LicenseVerifyParam param,Boolean enableLicense) { this.param = param; this.enableLicense = enableLicense; } /** * 安装License证书 */ public synchronized LicenseContent install(){ log.info("服务启动,检查是否启用license验证,结果:" + enableLicense); if (!enableLicense) { return null; } LicenseContent result = null; DateFormat format = new SimpleDateFormat("yyyy-MM-dd HH:mm:ss"); //1. 安装证书 try{ LicenseManager licenseManager = LicenseManagerHolder.getInstance(initLicenseParam(param)); licenseManager.uninstall(); result = licenseManager.install(new File(param.getLicensePath())); log.info(MessageFormat.format("证书安装成功,证书有效期:{0} - {1}",format.format(result.getNotBefore()),format.format(result.getNotAfter()))); }catch (Exception e){ log.error("证书安装失败!",e); } return result; } /** * 校验License证书 * @return boolean */ public boolean verify(){ LicenseManager licenseManager = LicenseManagerHolder.getInstance(null); DateFormat format = new SimpleDateFormat("yyyy-MM-dd HH:mm:ss"); //2. 校验证书 try { LicenseContent licenseContent = licenseManager.verify(); log.info(MessageFormat.format("证书校验通过,证书有效期:{0} - {1}",format.format(licenseContent.getNotBefore()),format.format(licenseContent.getNotAfter()))); return true; }catch (Exception e){ log.error("证书校验失败!",e); return false; } } /** * 初始化证书生成参数 * @param param License校验类需要的参数 * @return de.schlichtherle.license.LicenseParam */ private LicenseParam initLicenseParam(LicenseVerifyParam param){ Preferences preferences = Preferences.userNodeForPackage(LicenseVerify.class); CipherParam cipherParam = new DefaultCipherParam(param.getStorePass()); KeyStoreParam publicStoreParam = new CustomKeyStoreParam(LicenseVerify.class ,param.getPublicKeysStorePath() ,param.getPublicAlias() ,param.getStorePass() ,null); return new DefaultLicenseParam(param.getSubject() ,preferences ,publicStoreParam ,cipherParam); } } 五、Spring Boot Starter 自动配置5.1 配置属性类定义配置文件参数映射类,支持通过application.yml配置证书相关参数:/** * 证书认证属性类 * * @author : jucunqi * @since : 2025/3/12 */ @Data @ConfigurationProperties(prefix = "license") public class LicenseConfigProperties { /** * 证书subject */ private String subject; /** * 公钥别称 */ private String publicAlias; /** * 访问公钥库的密码 */ private String storePass; /** * 证书生成路径 */ private String licensePath; /** * 密钥库存储路径 */ private String publicKeysStorePath; /** * 是否启用license认证 */ private Boolean enableLicense; }5.2 自动配置类通过@Configuration实现自动配置,注入校验器 Bean:@Configuration @AllArgsConstructor @EnableConfigurationProperties(LicenseConfigProperties.class) public class LicenseAutoConfiguration { private final LicenseConfigProperties licenseConfigProperties; // 注入LicenseVerify Bean,启动时执行install方法 @Bean(initMethod = "install") public LicenseVerify licenseVerify() { LicenseVerifyParam param = new LicenseVerifyParam(); param.setSubject(licenseConfigProperties.getSubject()); param.setPublicAlias(licenseConfigProperties.getPublicAlias()); param.setStorePass(licenseConfigProperties.getStorePass()); param.setLicensePath(licenseConfigProperties.getLicensePath()); param.setPublicKeysStorePath(licenseConfigProperties.getPublicKeysStorePath()); return new LicenseVerify(param, licenseConfigProperties.getEnableLicense()); } }5.3 AOP 拦截实现通过自定义注解@RequireLicense和 AOP 拦截,实现接口级别的证书校验:5.3.1 自定义注解/** * 标记需要证书校验的接口方法 */ @Target({ElementType.METHOD}) @Retention(RetentionPolicy.RUNTIME) public @interface RequireLicense { boolean value() default true; // 是否启用校验(默认启用) }5.3.2 AOP 拦截逻辑@Slf4j @Aspect @Component public class RequireLicenseAspect { private final LicenseVerify licenseVerify; private final LicenseConfigProperties properties; public RequireLicenseAspect(LicenseVerify licenseVerify, LicenseConfigProperties properties) { this.licenseVerify = licenseVerify; this.properties = properties; } // 拦截所有添加@RequireLicense注解的方法 @Around("@annotation(requireLicense)") public Object around(ProceedingJoinPoint point, RequireLicense requireLicense) throws Throwable { // 注解禁用校验或全局禁用校验,直接执行方法 if (!requireLicense.value() || !properties.getEnableLicense()) { log.info("接口[{}]跳过证书校验", point.getSignature().getName()); return point.proceed(); } // 执行证书校验 boolean verifyResult = licenseVerify.verify(); if (verifyResult) { return point.proceed(); // 校验通过,执行原方法 } else { throw new LicenseInterceptException("接口调用失败:证书未授权或已过期"); } } }5.4 注册自动配置类在src/main/resources/META-INF目录下创建spring.factories文件,指定自动配置类:org.springframework.boot.autoconfigure.EnableAutoConfiguration=\ com.jcq.license.autoconfigure.LicenseAutoConfiguration,\ com.jcq.license.verify.aop.RequireLicenseAspect六、Starter 打包配置为确保其他项目引用 Starter 时能正常加载类,需修改pom.xml的构建配置:<build> <plugins> <plugin> <groupId>org.springframework.boot</groupId> <artifactId>spring-boot-maven-plugin</artifactId> <!-- 跳过Spring Boot默认的可执行JAR打包(避免类路径嵌套在BOOT-INF下) --> <configuration> <skip>true</skip> </configuration> </plugin> </plugins> </build>原因:默认情况下,Spring Boot 插件会将类打包到BOOT-INF/classes目录下,导致其他项目引用时无法通过常规类路径加载类。设置skip=true后,会生成标准的 JAR 包,类路径更友好。七、使用示例7.1 引入依赖在目标项目的pom.xml中引入自定义 Starter:<dependency> <groupId>com.jcq</groupId> <artifactId>license-spring-boot-starter</artifactId> <version>1.0.0</version> </dependency>7.2 配置参数在application.yml中配置证书相关参数,配置时idea会弹出提示:license: subject: 企业版软件授权证书 public-alias: publiccert store-pass: 123456q license-path: classpath:license.lic # 证书文件存放路径 public-keys-store-path: classpath:publicCerts.store # 公钥库路径 enable-license: true # 启用证书校验7.3 接口使用注解在需要授权的接口方法上添加@RequireLicense注解:@RestController @RequestMapping("/api") public class DemoController { @GetMapping("/sensitive") @RequireLicense // 需要证书校验 public String sensitiveOperation() { return "敏感操作执行成功(已授权)"; } @GetMapping("/public") @RequireLicense(false) // 禁用校验(即使全局启用也会跳过) public String publicOperation() { return "公开操作执行成功(无需授权)"; } }八、总结本文通过自定义 Spring Boot Starter 整合 TrueLicense,实现了一套灵活的证书授权方案,核心优势包括:可插拔性:通过 Starter 封装,引入依赖即可使用,无需重复开发。灵活性:支持全局开关和接口级开关,方便测试环境跳过校验。安全性:基于非对称加密和硬件绑定,防止证书伪造和非法传播。易维护:授权到期后只需替换证书文件,无需修改代码或重启服务。实际项目中可根据需求扩展校验维度(如 CPU 序列号、内存大小等),进一步增强授权的安全性。附录:核心类说明类名作用LicenseCreator证书生成工具类LicenseVerify证书校验核心类(启动校验 + 实时校验)LicenseConfigProperties配置参数映射类LicenseAutoConfigurationStarter 自动配置类RequireLicense接口校验注解RequireLicenseAspectAOP 拦截器(实现接口级校验)完整源码可参考 GitHub 仓库:https://github.com/Jucunqi/license-spring-boot-starter.git(示例地址)。